
Wrestling with Printer-Induced Roller Marks on Paper
Problems with the mechanics of how printers handle fine quality paper for printing
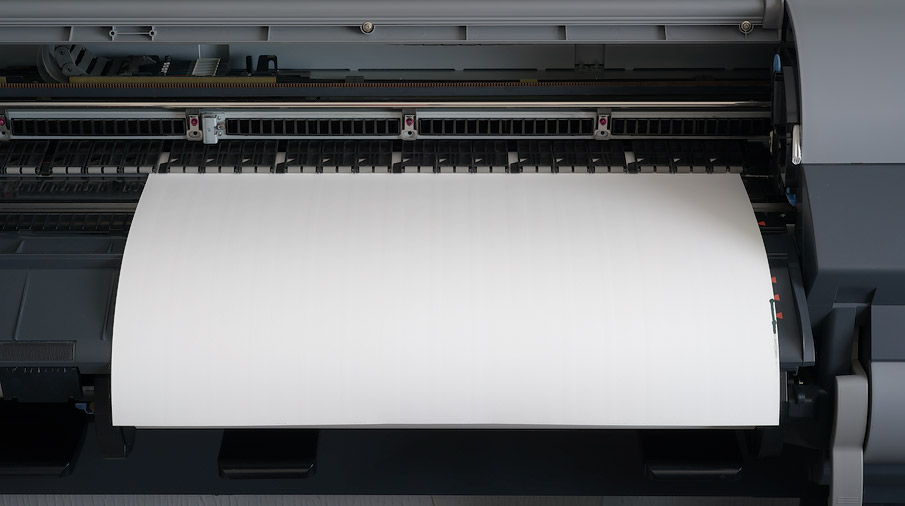
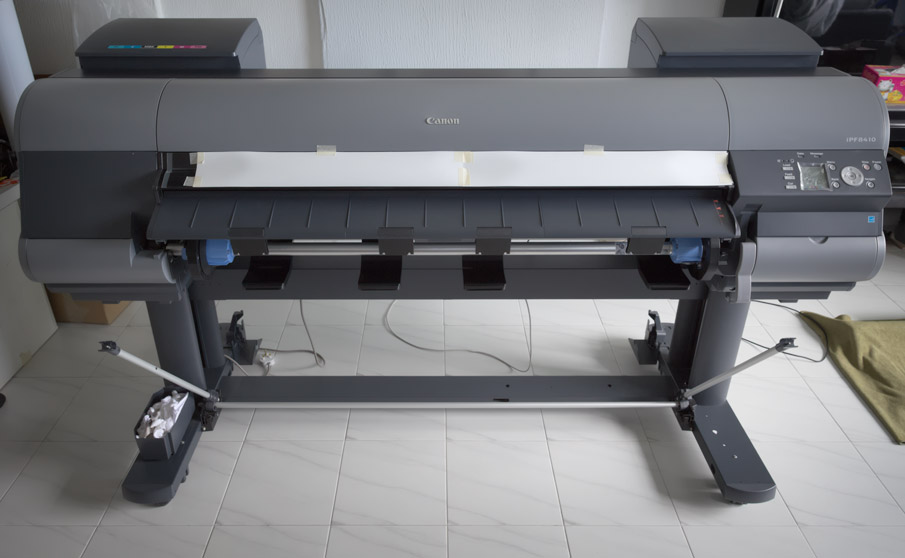
Canson BKF Rives 310gsm paper loaded into Canon iPF8400 printer, showing pinch roller marks. This is equivalent to the worst-case scenario with my first iPF8400 if the paper was passed under the rollers about 5 times or more. For some reason, my documentation from seven years ago was lost, so I had to re-create equivalent roller pressure on the paper. Illumination is indirect sunlight from the balcony to the right, somewhat diffused but sufficient to notice the problem. The dents running vertically down the paper correspond perfectly to the roller positions. Note the grey lever mechanism in the lower right, which the user manually operates to raise and lower the pinch rollers (the little grey cylinders about 13mm wide running horizontally on the far side of the visible portion of the paper).
This is what the problem looks like, is totally unacceptable and one way or another, I had to make it go away.
Contents
Caveat Emptor
Detailed explanation of the problem
Understanding Canon’s pinch roller mechanism
How I modified the printer’s pinch roller springs
Conclusion
Caveat Emptor
Do not be mistaken that this problem is isolated to only Canon imagePROGRAF iPF8400 printers or due to the fact that they were no longer made in Japan. Apparently, there were quality issues when Canon shifted manufacturing to China, but those are unrelated. I now know the problem had already existed on older, made-in-Japan printers, and also on other printers from all of the Big Three (Canon, Epson & HP).
Canon Japan eventually made an official statement via the Southeast Asia regional headquarters to me that any printer using rollers to feed paper will definitely leave marks from said rollers, which will inevitably be more obvious for softer papers, and they do not consider it a machine defect. Read: they cannot do anything at all to help you. Don’t expect any different from the others of the Big Three. Tens of thousands of online exchanges for well over a decade perfectly demonstrate this point. Open a case with them at the risk of your sanity.
The iPF8400 shares the same pinch roller mechanism (same replacement part number; it is identical) as all iPF 8xx0 and iPF9xx0 printers, dating back over a decade and half of this platform. The new Canon imagePROGRAF PRO-2000/2100 and 4000/4100 printers share a similar though not identical pinch roller design and are potentially vulnerable to the same flaw. I’ve not heard of any complaints, but then I didn’t either at the time of purchase for my iPF8100 and iPF8400 printers which I owned and operated for over a decade in total. Watch out.
I also happen to know, on good authority, that the Epson SureColor P9000 and Stylus Pro 9900 printers (and I suspect but am not certain, 24″ models as well), also suffer from roller marking issues. I do not know if the newer SC-P9570 is free of the problem. It might but never assume. Remember what Canon said about all printers with paper handling rollers. Lately, I’ve heard about an HP DesignJet Z9+ 24″ printer experiencing a similar problem. I’ve been to a live demonstration of this printer at launch and did not notice any such problem but not enough attention was paid to it at the time, which goes to show how difficult it is to casually spot the problem rather than that it doesn’t exist. It’s not the most obvious thing without the right lighting.
Discerning printmakers have dealt with all kinds of paper handling issues for centuries and will continue to do so. Paper is a fussy hygroscopic thing, in constant flux as it changes to maintain equilibrium with its immediate environment. But this particular issue is neither buckling nor cockling due to humidity or storage issues. Neither is it novel.
This article documents my process towards resolving the roller marks issues as it relates to my work, serves as a self-reminder and maybe also provides some useful information to others. I wished to publish sooner, but my printer was still under warranty. After all these years, user complaints of a similar nature are still not at all prevalent and I’ve always wondered what others have done to overcome them. In the course of my investigations and dealings with multiple low, mid and high-tier personnel in Canon’s printer service department, as well as my own independent exchanges with other photographers and printmakers, I’ve come to realise my senses are more acute than most, and I’m not easily satisfied. So if you tell me all of your printers are free of such problems and I should go eat my hat, I’ll say: be very grateful you’re not similarly cursed. And you should stop reading here.
Detailed explanation of the problem: pinch roller marks
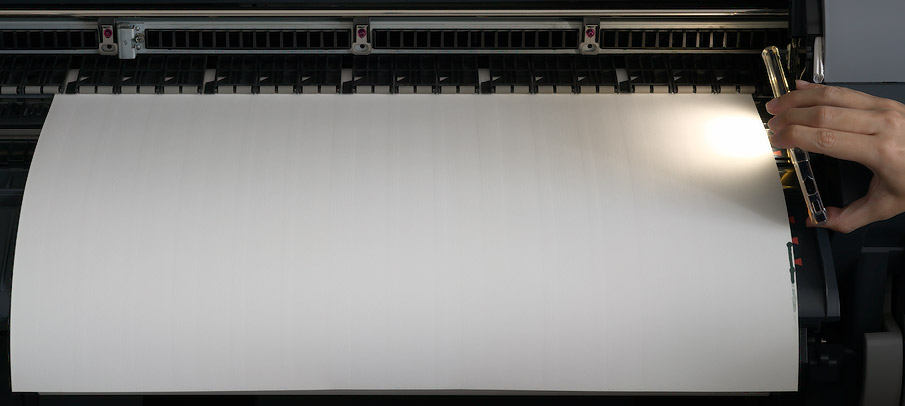
Same Canson BKF Rives 310gsm paper loaded into Canon iPF8400 printer, this time illuminated by LED flash from a mobile phone. Indentations are more obvious under this illumination.
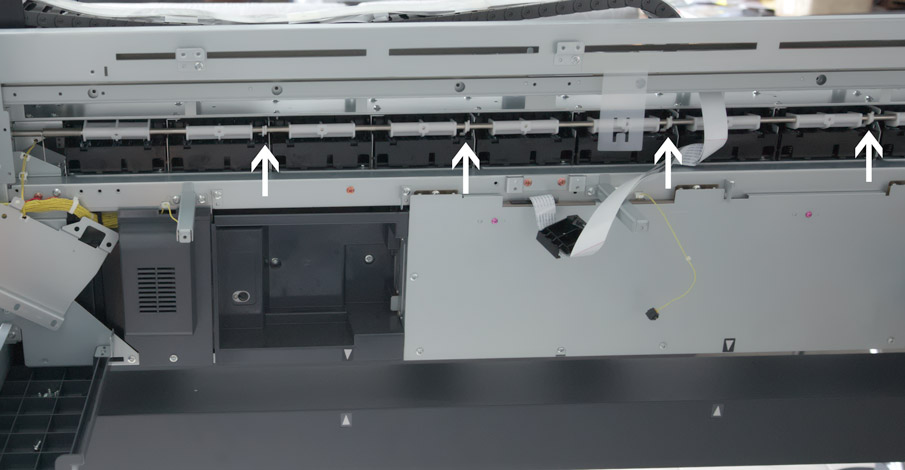
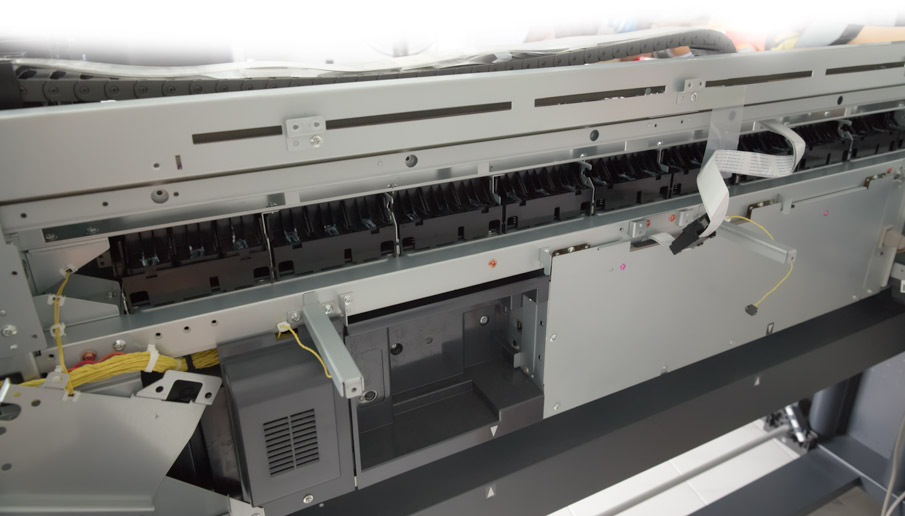
May I call your attention to this part of the paper feeding mechanism on Canon imagePROGRAF iPF8xx0 and 9xx0 printers: On the inner edge of the printing platen are spring-loaded paper-handling pinch rollers, made of a greyish semi-hard rubbery polymer, that can be raised or lowered by the user manually operating a lever arm on the right side of the printer, just below the control panel, for loading and unloading paper. The printable side of the paper faces up; this is the side the pinch rollers come into contact with.
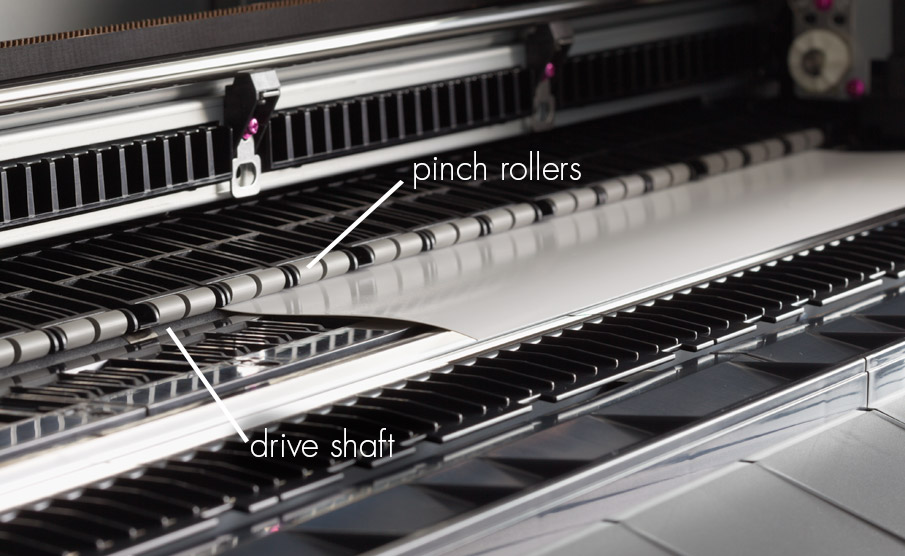
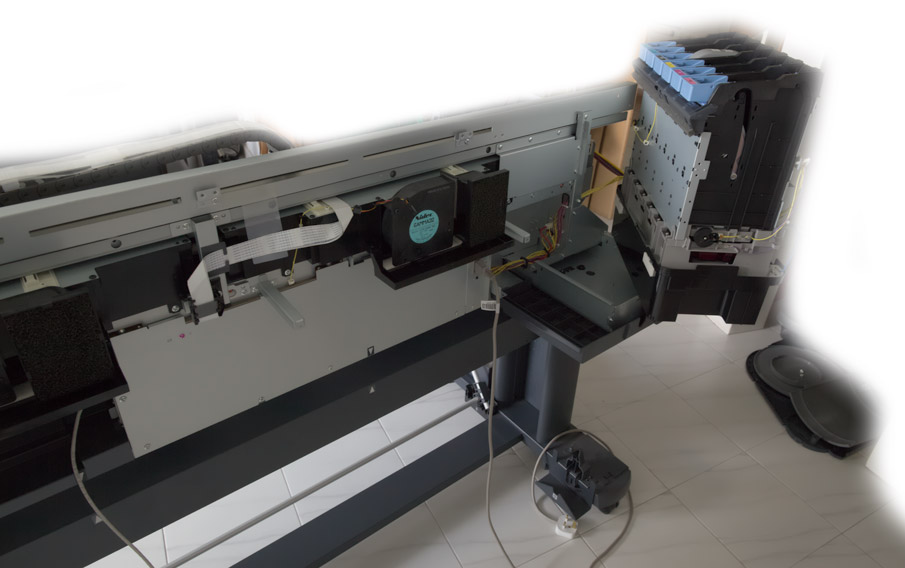
Platen-side paper feeding mechanism on Canon imagePROGRAF iPF8xx0 and 9xx0 printers
These pinch rollers hold down printable media (usually paper) onto a motorised stainless steel drive shaft, positioned directly under the pinch rollers. This is the primary driving mechanism for controlling the feeding of paper onto the print platen. The drive shaft has a dark grey coloured polymeric friction coating on it for gripping the verso side of paper. It is sticky to the touch and textured, feeling like 400 grit sandpaper but is semi-hard and does not damage the paper in any visible way. The problem is the spring-loaded clamping force exerted by the pinch rollers is so great as to leave continuous, shallow, trench-like dents on paper, parallel to the feed direction, as it moves through the printer.
The roller marks may be more or less visible depending on several factors. Roll or sheet paper share the exact same paper path but have different loading behaviour.
- Initial number of passes under the rollers. When roll paper is loaded, it has to pass under the pinch rollers to be pushed through onto the print platen. The user then lifts the pinch rollers using the lever mechanism to adjust the positioning of the paper. The lever is lowered after for the pinch rollers to clamp down onto the paper. The printer then takes over and scans the paper for size and positioning. The paper is typically drawn back to its leading edge, then passed over the platen again for skew alignment adjustment and measurement, and then drawn back into the printer back to the cut edge. During printing, the paper is fed under the rollers once more. This means the leading edge of the paper, about 20 inches or so of it, passes under the rollers a whopping 5 times at a minimum, while the rest of the paper may only pass under the rollers once. Junking the first 2 feet or so of some of the world’s most expensive papers before every print session adds up pretty quickly. The roller marks might be less severe under one pass, but it is not invisible damage either. In my case, I had to junk almost every single print.
- Softer papers such as Canson Rag Photographique or Platine Fiber Rag which are relatively unsized (read: spongey because the paper fibres are not compressed and glued down as tightly during manufacture) are particularly vulnerable to getting crushed or indented by the pinch rollers. Harder and denser papers like resin-coated papers are more resistant to getting crushed. I’ve heard of canvas media getting marked but I’ve never once been able to roller-mark my favourite printing canvas with my printers, and after varnishing and stretching, even fold marks from deliberately creasing the canvas largely disappear. Canvas is really tough. Cotton fibre paper isn’t. All paper, fibre-based or resin-coated that I could lay my hands on, were crushed by the pinch rollers of the two iPF8400 printers I had.
- Roll paper is often mechanically fed out again by the user (the printer has control buttons for this) and inspected for flaws such as flecks of debris or cotton seeds prior to printing. Many papers shed dust due to the manufacturing process and require gentle cleaning with a soft-haired brush and/or air blower. The paper may be fed in and out several times during the inspection process, potentially making the roller marks more severe.
- Thickness of the paper. I’ll explain more in the next section.
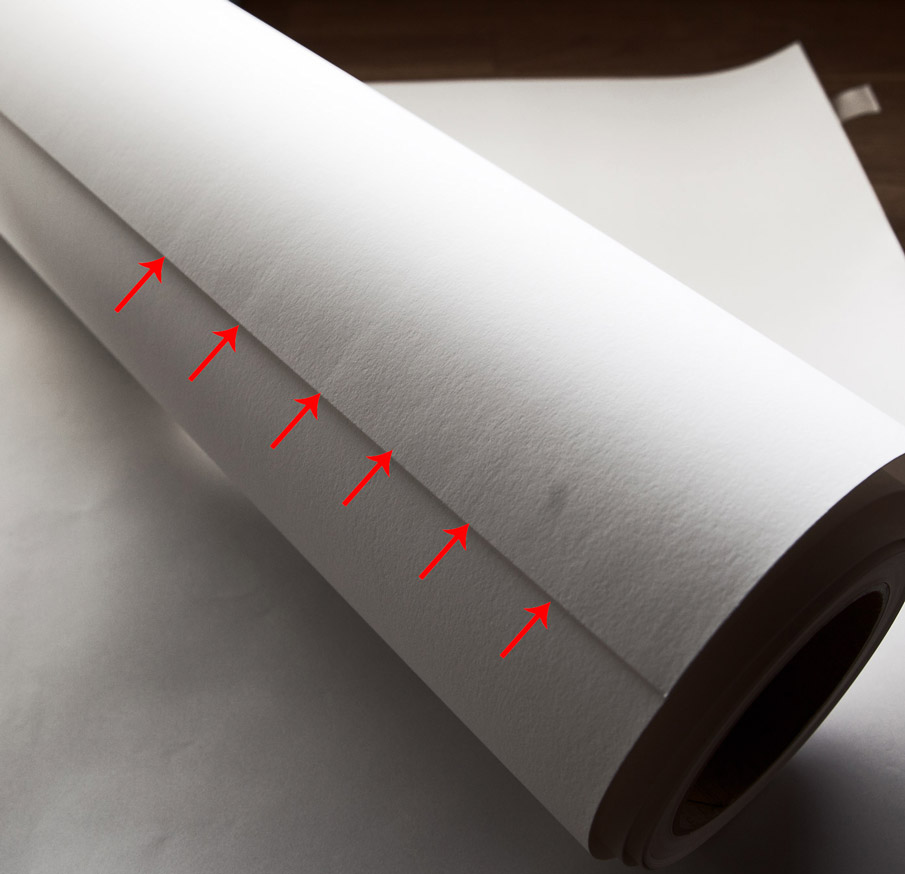
Roller marks on a roll of Canson Rag Photographique 310gsm caused by pinch rollers of Canon iPF8400 exerting too much pressure and crushing/denting the paper. These marks were from a single loading trip through my original iPF8400, which has since been replaced with another that did the same thing. Retrieved this 6-year-old jpeg image from a 15 July 2014 forum post that documented actual damage.
These roller marks are not scratches. Increasing the platen gap or raising the printhead height is not going to solve the problem. It is also not because there is something wrong with the paper, nor that it is not original equipment manufacturer (OEM) paper, which is the pathetic excuse the service guys like to tell you to avoid handling your case (I’ve been given all the best excuses you can’t even imagine). At the time, Canon shamefully did not sell any roll paper in my country, despite selling these wide format roll media printers for well over a decade, so their attempt to lay blame on my paper choices were moot. They later specially air-freighted in some of their OEM paper from Japan for testing and only then formally acknowledged the issue, which was previously denied to exist. This was prior to their final statement mentioned earlier that all printers using rollers will mark paper.
Roller indentation marks are visible only when raking light is shone across the surface of the paper, casting shadows. Diffused or straight-on illumination obscures the problem entirely. Glossy media may make the issue more obvious because their inherent sheen is reflective and any distortion becomes very obvious when there is glare.
My initial encounter with roller marks was with my very first Canon printer, an iPF5000. During the weeks of troubleshooting with Canon technicians, I discovered that the rollers had been redesigned in the replacement model, iPF5100. They were the same overall dimensions but of a slightly different shape which gave them far more stability in operation, which we found to avoid marking softer papers. We were thus able to make a little Frankenstein by putting parts for an iPF5100 into an iPF5000 and the printer worked brilliantly. So while I was already well-aware and hypersensitive to such issues, roller marks caused by my iPF8100 escaped me for years until I pulled old prints out of a drawer and inspected them after learning it shared the same pinch rollers as the iPF8400. This should give you an idea of how subtle the issue can be. I don’t care if anyone says they have never noticed such a thing. I won’t believe it until I test the printers for myself and thoroughly studied their paper handling mechanisms.
Some might say that these issues may go away when you mount the print to stiff board or an aluminium composite panel, or that it is not really visible when framed under glazing, or that you should choose a different paper that marks less easily. It didn’t help in my case, and anyway it’s wholly unnecessary to explain why this is not always a possible solution in the pursuit of making finely-crafted prints. Everyone has different print mounting and display requirements.
I can assure you, any of the Big Three’s repair and support departments will be a total pain in the a– to deal with if you have this kind of problem and report it. They will and can do absolutely nothing to help you solve it, because this is by design. No repair is possible; there is nothing to repair. The printer needs a re-design to fix the problem, but in Canon’s case, that was never changed in ~15 years of ImagePROGRAF printer design. I wasn’t holding my breath for a future model to resolve it. Everybody knows this; it is fact: printer problems suck, always, period.
Desperate to get my printer working optimally again with papers it was always (but poorly) engineered to print on, I was forced to modify my printer. Follow along at your own risk!
Understanding Canon’s pinch roller mechanism
Canon’s pinch roller assembly uses coil springs to exert clamping force through the pinch rollers onto paper. There are two 13mm-wide rollers to each plastic arm, one spring for each arm, and typically three arms to one assembly. 44″ printers have nine of these assemblies and one single-arm assembly. That’s 28 pairs of pinch rollers and 28 coil springs. The steel shaft and plastic arms are stiff enough that the rollers do not rock about in operation, though the centring and roundness of the little grey rollers vary more than I would like. But this is not the cause of the roller marks.
The paper loading lever handle on the front of the printer is mechanically coupled to a camshaft and manually operated by the user. This camshaft controls the lifting and lowering of the pinch rollers, by depressing on the flat side of its rear section (see video below), compressing the spring in the assembly.
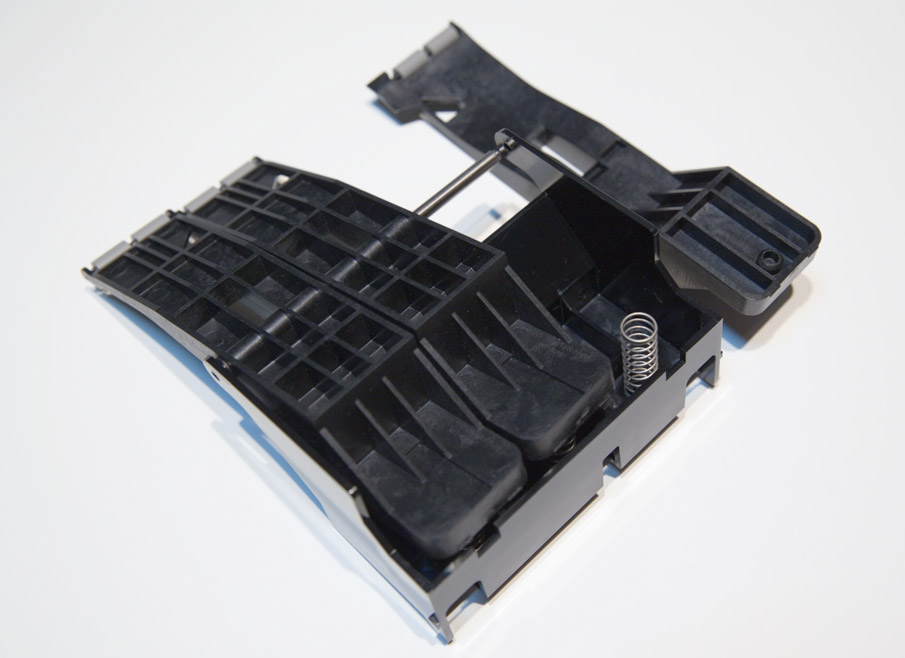
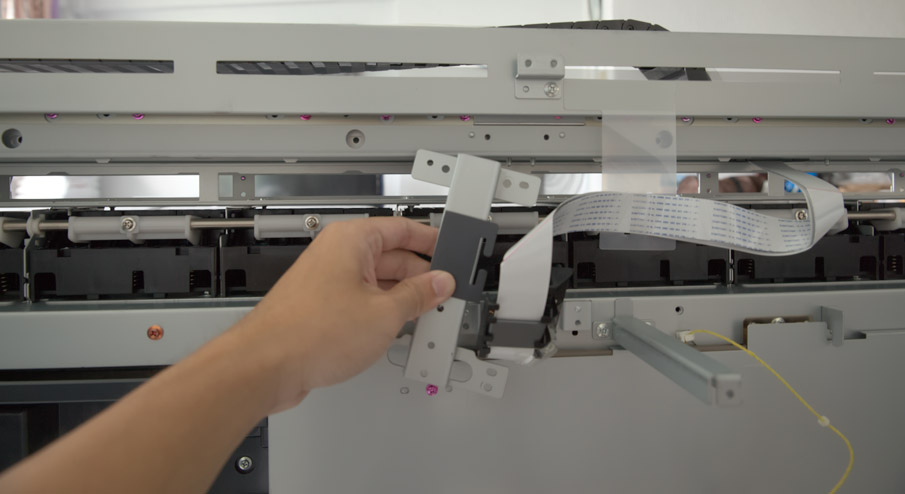
Pinch roller assembly for iPF 8/9xx0 series printers, partly disassembled, showing one of the coil springs and its location. This spring is what provides the clamping force for the pinch rollers. Note the small stainless steel shaft that runs through the pinch roller black plastic “arms”. To disassemble, use finger force to pry apart the plastic walls until you can dislodge the shaft, and then the roller arms can slide out to reveal the springs.
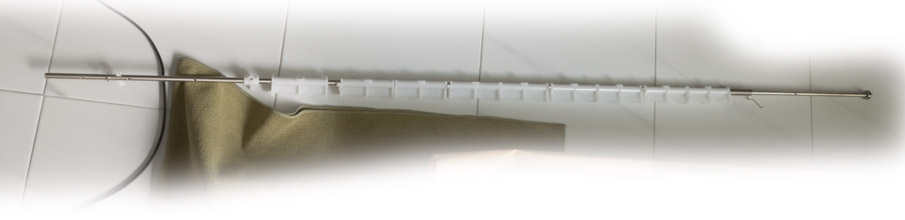
This video shows the camshaft in operation. White plastic tabs are screwed onto a stainless steel rod, forming the camshaft. When the control lever is lifted, the camshaft rotates and compresses/depresses the spring side of the pinch roller arm (pinch rollers in raised, open position). When the control lever is lowered, the camshaft rotates back and the spring side of the pinch roller arm is pushed up by the spring’s force (pinch rollers closed position). This is the clamped-down “closed” position when the printer is in operation.
Note that the coil springs are always under some amount of compression when installed in the printer and the range of movement is limited. It’s just more or less compression, i.e. more or less pressure is exerted by the rollers onto paper. Raising the position of the pinch rollers makes the springs more compressed, thus exerting more clamping force on the roller end. This is the explanation for point #4 earlier: thinner paper is thus naturally held down by less pressure, and thicker paper is held down by more pressure. It would stand to reason that this is good because thick paper tends to be stiff and needs more force to hold it down flat. Good inkjet printing paper is typically relatively thick, but these thick papers for fine printing tend to be relatively soft, while the thinner resin-coated types tend to be relatively dense and less compressible.
Maybe one can weaken the coil springs. Continuously compressing a coil spring does weaken it over time, which is known as spring creep. The weakening is most severe initially, then tapers off over time to almost no effect. But the amount of weakening, when the spring is compressed well within its elastic deformation, is extremely small. Cycling loads are more effective at weakening a spring than static compression, but pumping the control lever handle to exert many loading and unloading cycles did not help weaken them noticeably to matter. The limited movement of the camshaft never compresses these springs enough. Don’t waste your time like I did to pump the handle like an idiot.
So you have to replace the springs with weaker ones, which entails the skin-crawling horror of disassembling a very expensive and delicate machine by yourself, because the OEM technicians are not allowed to do this for you. I took the plunge.
How I modified the printer’s pinch roller springs
Surgery began on the morning of 24 April 2015 at 5am. I finished off making a bunch of necessary prints to get them out of the way, because I had no idea if the surgery would cause any permanent damage and put me out of action for a while. About six months prior, a senior Canon technician showed me how to gain access to the pinch rollers when we had the printer completely disassembled to fix unrelated catastrophic electrical issues (it was malfunctioning straight from the factory), and so I was feeling pretty confident about doing the operation myself. He said it took him about 4 hours to take them out and put it all back together on the demonstration machine in the company’s showroom, which he had to do when we were attempting a different solution early on. I had a rough idea of what to expect and hoped I remembered all the important details.
Whatever you do, NEVER loosen any of the pink-coloured screws. They are factory installed to very tight tolerances, and you’ll ruin your printer’s alignment for good if you unscrew them. No technician is allowed to undo them; they can only be fitted on in the factory.
Canon iPF8400 getting ready for spring replacement surgery
Getting the side and top plastic covers off is easy. Just find all the catches and tabs that hold them in place and lever them out of the way. No tools are necessary though a flathead screwdriver may be nifty for a bit of prying. I’ve ever had some Canon techs come over and roughly yank them out by brute force, breaking and bending stuff…yikes! After that, it was taking off the ink tank covers and removing securing brackets and holding screws, then swinging the ink stations out of the way. There’s one on each side of the printer.
Left side ink station. They have to swing out of the way for access to the pinch rollers

Right side ink station in swung open position. They are designed to swing open and come to rest like so. Looks scary if you did not know they work like that, looks like it’s going to fall over!
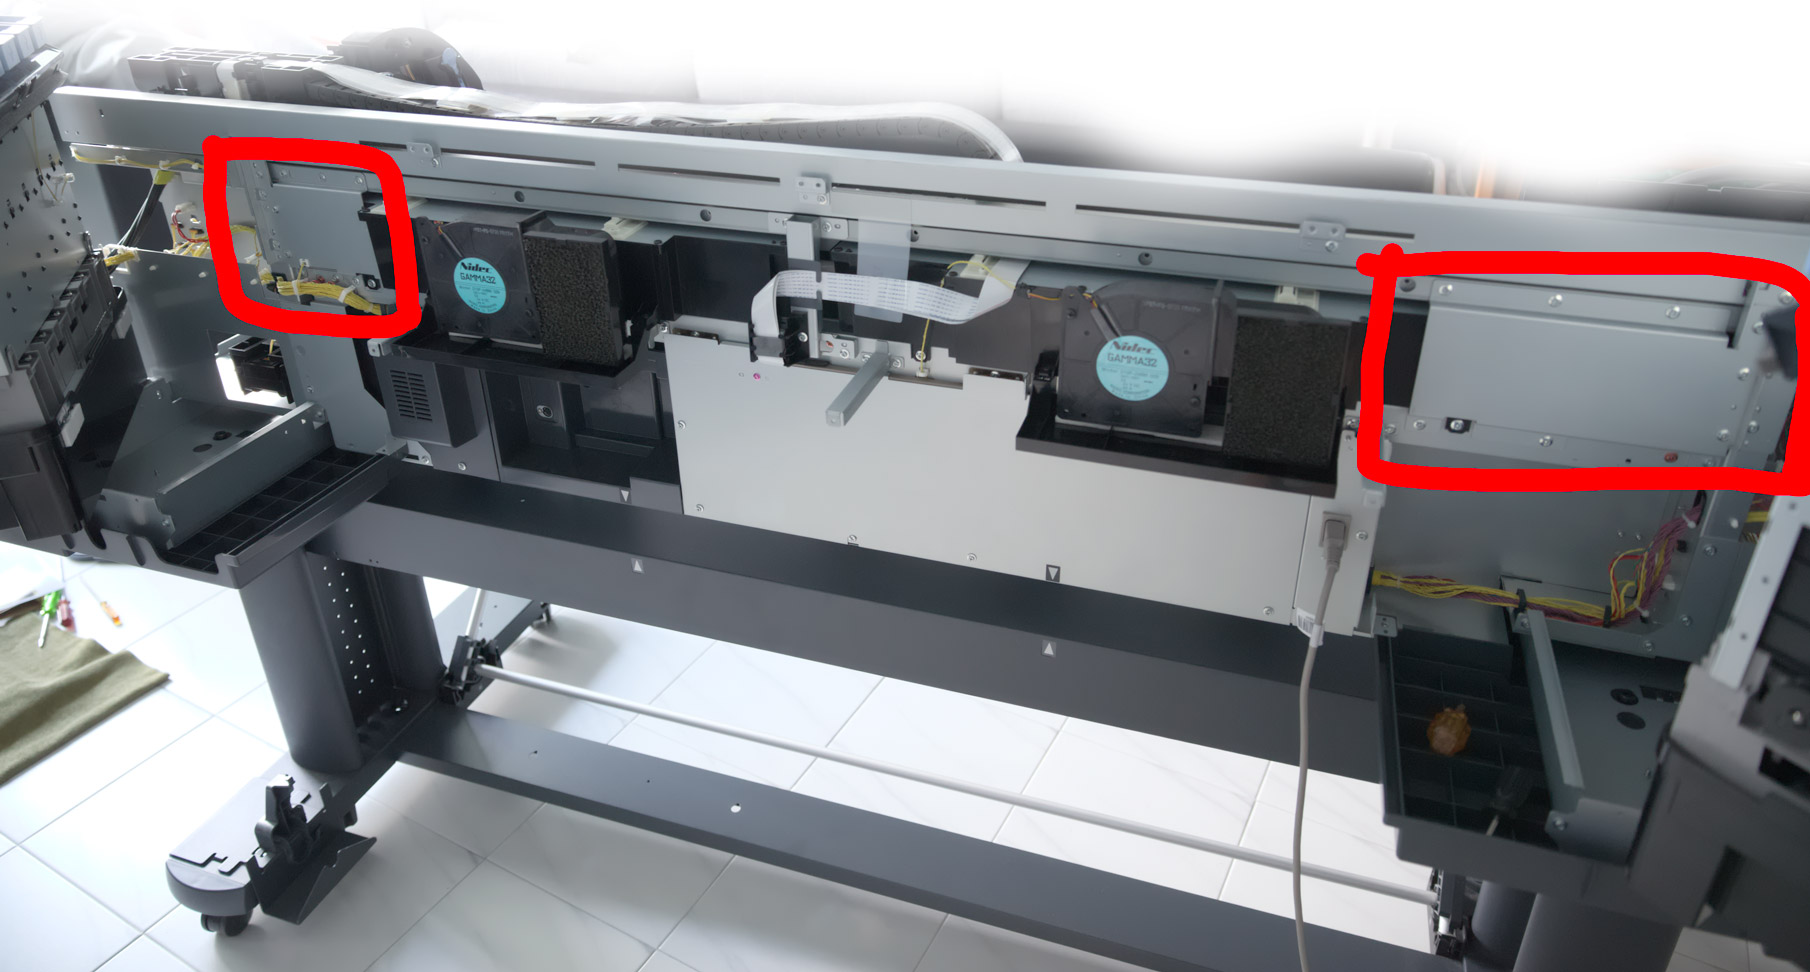
These brackets partially hold the vacuum system in place and appear to be support brackets for stiffening the chassis and need to be removed.
Another support bracket which also holds the carriage relay flex cable has to be removed, with care not to damage the fragile cable.

Then the vacuum pumps and filter assemblies are removed.
This was all I was shown by the technician. Here on out, I was on my own. The pinch roller camshaft is mechanically linked to the lever handle on the front side of the printer, which controls the opening and closing of the pinch roller assembly. For a while, I struggled to figure out how to remove it.
I was initially confused by the torsion spring on the left side of the shaft, but it would not come free if the shaft was not removed entirely from the printer, and I could not slide the shaft out from the side.
Then I realised I needed to release a bunch of C-shaped retainer clips appearing at intervals along the camshaft. This unlocked it.
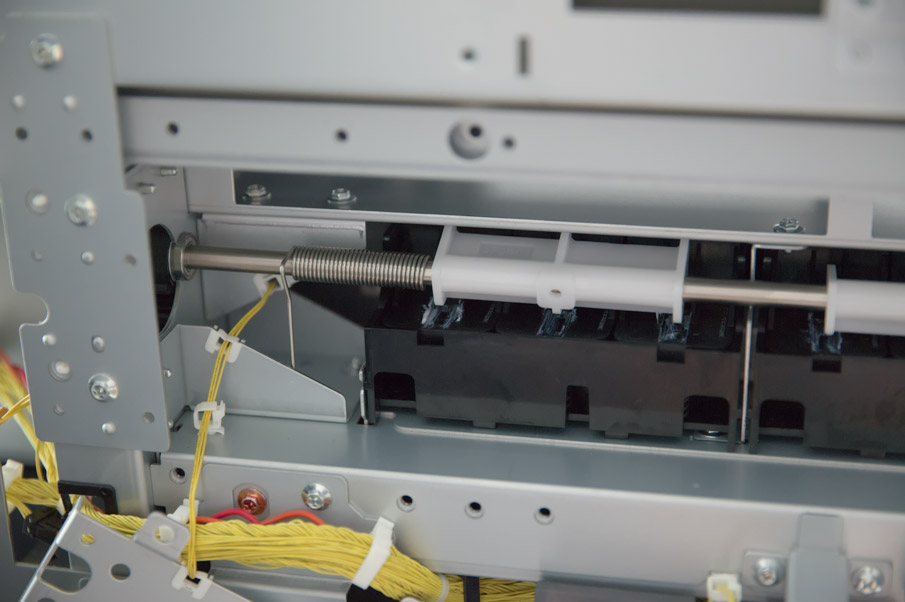
Camshaft in-situ, showing the positions of the retaining C-shaped clips
This freed the entire length of the camshaft. The end of the shaft connected to the release lever is held in place by one screw to a set of gears. Foolishly I forgot to take pictures before removing that screw, and one of the gears fell out. I’ll have to figure out its correct installation position later.
Camshaft is removed, with some difficulty.
Now we have finally gained access to the pinch rollers!
Pinch rollers (all the black plastic) with camshaft out of the way.
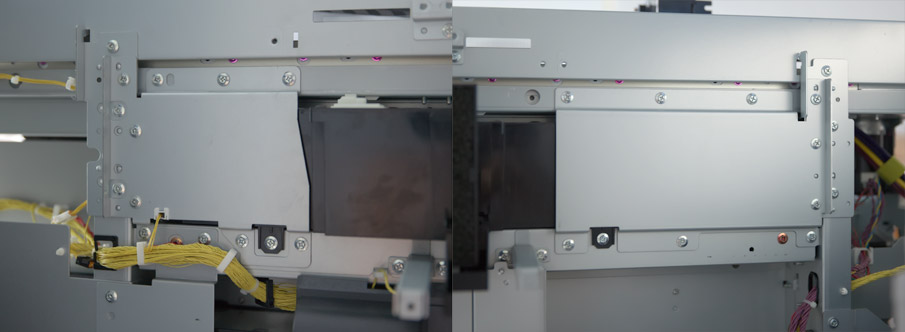
To remove the pinch roller assemblies, one has to depress fully the back end (compressing the springs fully) and side the white plastic cams out. But wait – there are a whole bunch of screws (not the pink ones!) on the metal rail directly above them with tips that extend so far that they are blocking the rollers from coming out. Loosen without removing them completely and the rollers come free.

Close up of the pinch roller assemblies – you can see the white lithium grease in the central ruts where the camshaft depresses on to push the back end down, which correspondingly opens the roller ‘jaws’ on the front side to let paper through. The springs are centred under the plastic arm and the camshaft depresses on the central part above the spring. This minimises uneven pressure.
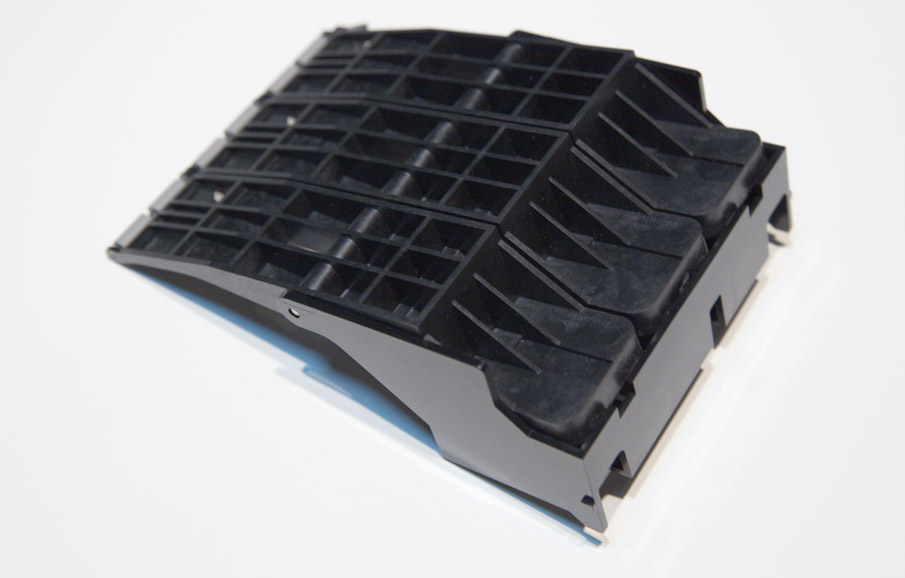
Pinch roller assembly of iPF8xx0/9xx0 printers
This is one of the pinch roller assemblies. There are nine of these sets of threes and one single one. Earlier, I showed what it looks like disassembled.
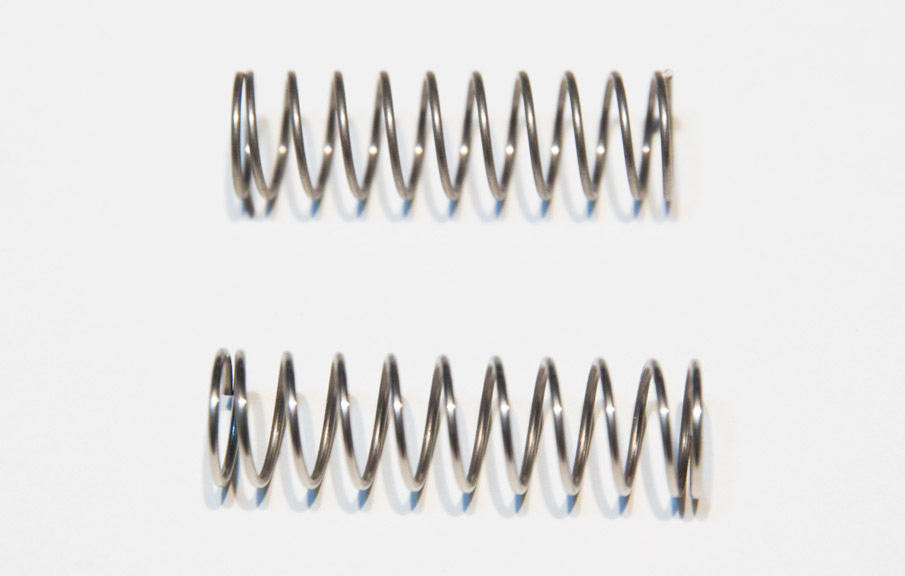
Pinch roller coil compression spring, new (top) versus old (bottom).
The original spring is about 38mm long, outer diameter 10.7mm and gauge 0.89mm. I consulted with Singapore Spring Pte Ltd, who happened to have a suitable replacement in stock. The new spring is 35mm long, outer diameter 10.5mm and gauge 0.81mm. The original spring constant was determined to be 61g/mm and the new one is 41g/mm. I wanted something a little weaker but they did not have one in this size, and also wondered if there would be enough holding force for stiff paper while keeping sufficient tension on the roll feeder unit. The new springs were calculated to apply roughly half the force of the original ones, and they felt good squeezing them between my fingers. That was as far as I was willing to risk it, so here goes…
Installing the camshaft gear back was easier than I thought. The factory indicates with a white marker two dots on the black gear that fell out earlier which must correspond to the one on the printer’s drive side.
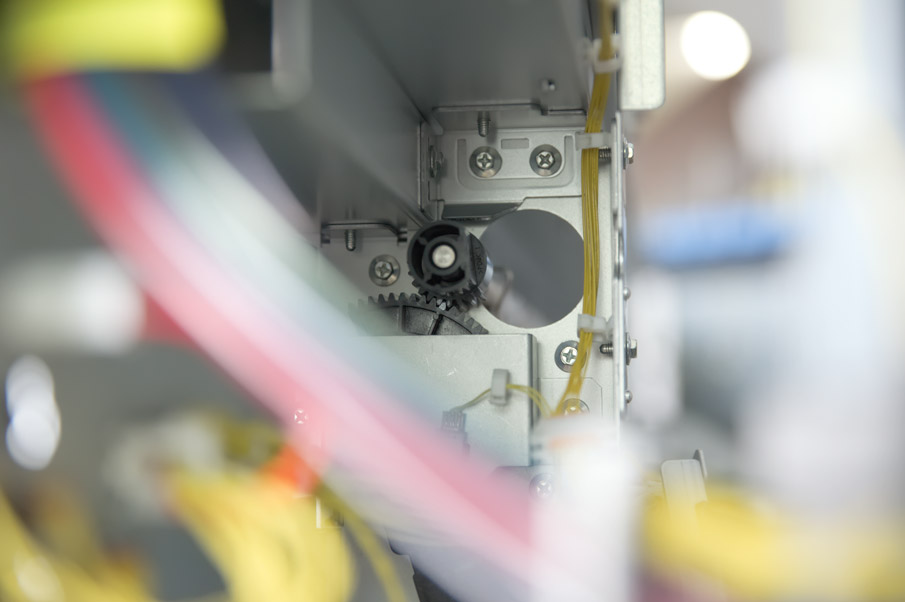
Fortunately, the gear that fell out has a helpful marking to indicate the correct installation position.
But sliding the camshaft back in was a real bitch. All the cams had to be in the right position over the pinch roller assemblies and the retaining clips on the correct side of the fastening point. On the leftmost end is a torsion spring, which puts the first cam under tension and gives the lever some feel when operating it. My dad helped to hold one end in place while I fiddled with all the bits.
Finally, the camshaft is back in place. I locked the retainer clips, replaced the screws for the cams and tested the lever mechanism to be sure before reassembling the printer. Worked perfectly! And the spring force felt considerably less too.
Reassembly. Two vacuums go back in first. I forgot to connect the switch and only realised when I turned on the printer. I had to redo that. I made sure to carefully note which screws went where. Reassembly was otherwise uneventful. It was past 5 pm in the evening when I was done.
So many screws for just these two brackets! Canon says the iPF8400 had their chassis strengthened so they vibrated less when printing, allowing for more precise dot placement. Maybe that’s part of the ‘strengthening’ right there.
Conclusion and some Rambles
I mocked up two spare pinch roller assemblies with old and new springs for a comparison. The old ones apply about 2000g of force in the clamping position, while the new ones were about 900g. This matched quite closely with the calculations. The new springs apply about 8.5kg of clamping force across all 28 roller pairs while the old ones were putting ~19kg(!) of force. This would have been applied over a very tiny surface area of the paper, so no surprise that they were being crushed.
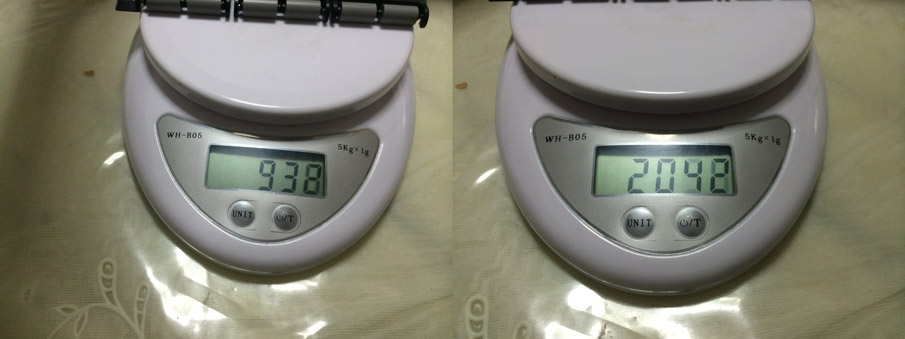
Measuring clamping force applied by old versus new springs.
The printer is working well and has been for the last six years. During initial testing, feeding the softest papers like Canson Platine and Rag Photographique in and out three times (6 passes) still resulted in faint marks but they were way less visible than before. Nowadays, I am unable to notice any marking of any paper I’ve ever tried using. There is no slippage nor banding problems due to paper feeding issues. I should add that paper should still not be left clamped-down in the printer for extended periods of time. The pinch rollers still exert enough force to leave dent marks on them eventually.
I did notice that I am unable to run the colour calibration routine on thick, stiff glossy paper, in particular, Harman by Hahnemuhle Gloss Baryta 320gsm. The printer reports that the calibration process fails and upon closer inspection, there is noticeable banding in the calibration chart print which is parallel to the print platen. I believe that this is a result of the clamping force being insufficient to prevent slippage of the paper during high-speed printing and feeding. Low-quality print modes are affected, but I never ever use those anyway. The calibration routine, unfortunately, uses a coarse feed setting and the paper is pushed forward quite violently (the printer shakes quite a bit, despite weighing over 150kg). There’s a simple workaround: Perform calibration on matte media or gloss media that isn’t as stiff. I mostly print on matte media these days anyway, so this little compromise has never bothered me.
I have no precise idea how the HP paper feed mechanism works, and if any reasonable solution could be found for their roller marks. The Epson P9000 uses a torsion (not coil) spring to depress the little shaft that is shared between three pinch rollers. There are multiple sets of three along the full width of the printer. It doesn’t take a genius to figure out the arm of the torsion spring is therefore applying unequal and unbalanced pressure between the three rollers. No surprise that it marks soft paper and that the marks align with where the torsion springs are positioned. It is a very poor design. Even if it were a spring for every two rollers, it will still exert uneven pressure on only one end of each roller. Maybe it can be modified to apply equal pressure at both ends of every pinch roller by adding torsion springs on both ends of each roller, and the springs must accordingly be weaker to provide the same total clamping force, but I haven’t given it much further thought. Canon correctly avoids this problem entirely with their design, except their spring force is just too much.
The number of wrong guesses by both so-called experts and non-experts on this topic never ceases to amaze me, especially from those who declare that there must be a problem with a specific printer unit. I’ve also not yet heard of any other viable solutions to the problem. I later learned that several owners of iPF8400 printers have experienced roller marks too. And then one of my paper dealers told me this isn’t news to him. His customers in the USA, mostly iPF8300 (some are made in Japan) owners, have the same problem and no one has had any repairs or replacements. The only thing any of them tried was pumping the lever handle in a futile attempt to weaken the springs.
My own experiences in dealing with this and other serious issues on my iPF8400 printers with the local OEM support and repair department left a very bad taste in my mouth. It took well over a year before everything was sorted out. I received a replacement printer that was malfunctioning the day it arrived, which eventually needed every single electrical component replaced, multiple printheads were replaced and a significant amount of ink and some paper was wasted in the process. In the end, it would have been cheaper to replace the printer for a second time. Thankfully, I’ve not had any major problems since I could not resolve on my own. If I could, I would rather perform self-repair than depend on the technicians to do it. Half the time, they are more clueless than I. The rest of the details are too horrifying to recount, and they would bore you anyway.
But one day I’ll need a new printer. It’s a weird time to be shopping for one. All the new generation products from the Big Three are seriously deficient and compromised in some important way when compared to the previous generation of printers they replace. The Epson P9570 seems most appealing for my usage, with the best ink set for matte media, but I don’t believe they have solved the clogging issues completely, and Epsons always waste an extraordinary amount of ink by telling you the carts are empty when they are not. They may have a reason for doing this, needing to keep the system pressurised and free of air bubbles. Canon printers instead have a massive ink reservoir (about 10 litres of ink!) which is never fully depleted even though the carts are always drained to their last drop. But this reservoir is limited in volume so this wastage is capped, while Epsons will waste more if you use more. At least the new Epson finally has dedicated channels for matte and photo black!
I don’t yet trust the paper handling of the new Epson printers. They are also suboptimal for roll media. Canon is the best that way since the paper path is curved in the natural curl of paper coming off a roll. HP is the worst, forcing roll paper to bend counter to its natural curl as it is fed out onto the platen. Epsons are unquestionably the best for printing with stiff, rigid media, but I’ve never needed that function.
Then Canon decided to optimise the inkset for printing on glossy media (gross) with the new Chroma Optimiser, throwing away the green ink channel, while the new ink encapsulation results in more gloss differential and bronzing. On the Pro1000 printer, the GCR (Gray Component Removal) is greatly reduced and far too much colour ink is introduced in the neutral and near-neutral colours, in an attempt to reduce dottiness which plagued the previous generations’ screening pattern. I’m under the impression that the large format Pro series have more aggressive GCR, but I’m not sure. I understand HP uses only black and grey inks to print R=G=B data sent through the OEM driver. That’s very nice indeed.
To make things worse, the print permanence of the new Canon LUCIA PRO inks are significantly worse than LUCIA EX. Epson claims increased permanence with their new inks, but in fact, after the polymer encapsulation degrades, the permanence cannot be said to be better. It’s a complex fading behaviour. HP has been the unqualified market leader in ink permanence. I was very interested in their new Z9+ printer, but it must come with a spectrometer built-in which I do not care for, since it is very limited in its function, and the latest drivers do not allow you to control the inking optimally, under-inking resulting in reduced gamut. Some inks use the 6pl droplet size only and the screening for colours needing those inks are coarse and visibly dotty. The newest Epsons have inking problems too, but their problem is over-inking.
It’s no fun to be treated as a beta tester when you’re in fact a customer of expensive, supposedly professional products. After decades of refining inkjet printing systems, they ought to produce better products. At least it shouldn’t be a significant step down from the previous generation of products. There are many other considerations when choosing a new printer. I can’t go into all of them here, and it’s not the purpose of this article. I’m betting it will pay dividends to continue to nurse this iPF8400 for as long as I can. Keeping things out of landfills isn’t so bad either. Good luck!
Samuel Chia
14 March 2021
Latest revision: 23 July 2021
References of potential interest:
https://forum.luminous-landscape.com/index.php?topic=40115
https://forum.luminous-landscape.com/index.php?topic=108705.0
https://forum.luminous-landscape.com/index.php?topic=91659.0
https://forum.luminous-landscape.com/index.php?topic=137749.0
https://forum.luminous-landscape.com/index.php?topic=18112.0
https://forum.luminous-landscape.com/index.php?topic=21426.0
https://forum.luminous-landscape.com/index.php?topic=32133.0
Comments are Disabled