
Pixel Shift 16-shots versus Stitching
Revealing real-world photographic examples about the nature of Pixel Shift you won’t find anywhere else. How useful is Pixel Shift? Does it actually increase resolution?
One is a single shot, one is pixel shifted 16-shots, can you guess which is which? It’s not quite what you might expect…
Introduction: setting the scene
The Pixel Shift vs Stitching experiment
Important details about the sample images
Setup Notes
Test with Lens #1 GF35-70mm
Test with Lens #2 Mejiro Genossen FL0530
Test with Lens #3 GF110mm F2
Conclusion and thoughts
Introduction: setting the scene
On 11 Feb 2020, Jim Kasson published a very controversial post: pixel shift does not increase resolution. Quite immediately, it raised the ire of a number of (very experienced) photographers who insisted that they could plainly see far more detail in 16-shots Pixel Shift images. So, what gives? Separately, Frans van den Bergh, one of the most respected in the field of MTF and image quality analysis, backs up Jim’s claim in a reply relating to MTF mapper (15 Jan 2021). I quote him, emphasis mine:
Pixel-shifted images are not supposed to produce MTF50 values (or actually entire SFR curves) that are different from those captured using the same sensor in its non-shifted mode, after accounting for scale as argued above. If you see large differences, then it is possibly caused by whatever processing the software does. In other words, pixel-shifting does not increase resolution (e.g., MTF50, or MTF10), but it does reduce aliasing significantly. The shifted images do look better, and may appear to have more detail, but this is a combination of reduced aliasing (less damage to fine patterns), and possibly stronger sharpening applied by the processing software. The best way to think of pixel-shifting is to keep in mind that the low-pass filter effect of the lens as well as the physical sensor photosite aperture remains the same when shifting, only the sample spacing is increased; this explains why the MTF50 / SFR is not expected to change.
Both Jim and Frans are looking at resolution in a very specific way to make this claim, that is, spatial resolution, which is what MTF quantifies. MTF describes how well contrast is preserved at different levels of detail. But it does not take into account improvements from reduced noise, better demosaicing, or cleaner details (from less aliasing, false detail, demosaicing errors), all of which could make an image look sharper or more detailed even if actual spatial resolution hasn’t increased.
If you don’t know what is pixel shift, first watch this short video by Sony that I consider to be the best illustration of how it works. There are three main flavours of pixel shift, 4-shot, 8-shot and 16-shot. I’ll ignore the first two for these experiments, but I’ll list the differences so you have a clear picture of what they do:
4-Shots
The sensor is moved in 1-pixel offsets in a 2×2 grid. No pixel resolution gain. Colour aliasing is fully eliminated. No elimination of luminance aliasing.
8-Shots (Olympus, Panasonic)
Combines 4-shots with an additional four shots that are shifted by half-pixel offsets diagonally for added spatial sampling. Pixel resolution is increased four times (some interpolation must be involved). Some aliasing remains since only half of all possible sub-pixel positions are sampled.
16-Shots (PS16)
Uses half-pixel shifts in a 4×4 grid to capture all 16 sub-pixel positions. Pixel resolution is increased four times. Near total elimination of all forms of aliasing, but limited by the sensor IBIS positioning accuracy and combining software behaviour/bugs, which also applies to 4- and 8-shots modes.
There’s even 32-shots Pixel Shift in newer cameras, which is basically PS16 but with two exposures for each sensor position. The double exposures are used to detect movement errors and for averaging down the noise to improve the signal to noise ratio.
The Pixel Shift vs Stitching experiment
I now own a camera (Fujifilm GFX 100S) that has this pixel shift function so I can test it myself, and in this article I mainly wanted to answer a question I have not seen satisfactorily answered anywhere on the internet apart from some anecdotal talk, by using real-world imaging, not theoretical simulations:
Is it better to use stitching or pixel shifting to gain more resolution for your pictures?
Let me explain what I mean, and set the parameters for the experiment. Take the Fujifilm GFX 100S sensor. In single shot mode, it takes 101 megapixel images, in PS16 mode, you get 4x the pixel resolution, 404 megapixels. An object that occupies a height of X pixels in single shot mode will now occupy 2X pixels in the PS16 image. Pixel shift is limited by the total number of shots (camera dependent), while stitching is obviously unlimited by how many frames you can stitch together.
So to make a fairer and more meaningful comparison, I will specify the object of interest to occupy the same number of pixels in both the PS16 and stitching-equivalent frame. To achieve this, for a given setup for the PS16 image, you need to double the magnification or double the focal length for the stitching-equivalent frame. I will also consider the practical limitations and issues of each method.
Important details about the sample images
I show a large number of test images in this article. They will take a while to load as they are 100% quality JPEGs and not compressed ones. If you are on a device with a high PPI display, you will be served “@2x”, “retina” images, which are 200% upsampled versions of the originals using Nearest Neighbour interpolation, i.e. there’s no difference from simply zooming in to 200% in an application like Photoshop. It is absolutely essential to avoid other resampling interpolators for this kind of comparison. In every comparison from somebody else I’ve seen so far, the single shot was wrongly upsampled using something like Bicubic interpolation (or worse), which alters the spatial resolution (MTF) of the image. This will produce a false comparison, making the single shot appear much more smoothed and smeary than it really is, exaggerating the benefits of pixel shift. Not to mention many of the comparison pairs I’ve seen were poorly prepared, often with different and wrong sharpening, strongly mismatched tone curve and camera profile, or heavily JPEG-compressed.
Check the indicated captions to see if the zoom magnification is at 100% or 200% or even higher. There’s a limit to how large an image I can serve up on this site so I tried to choose the most interesting and revealing crops to compare and show you.
The single frame crops were taken from the first image of the PS16 sequence to ensure that exactly the same focus position on the lens was used in both cases.
The PS16 images were assembled using the FUJIFILM Pixel Shift Combiner app, which creates a DNG file, which was then processed in Adobe Camera Raw with all settings zeroed (true zero). Single frame images were processed in RawTherapee using DCB+VNG4 hybrid demosaicing with no false colour suppression and all other settings also zeroed (true zero). This gives the single images a known processing methodology (RawTherapee and its code is open source), and it’s also the main processing method I use for all my important images and the best demosaicing I know of without resorting to A.I.. The main thing is to have zero sharpening, noise reduction, CA removal, and also the tone curve and white balance should be matched between frames. Due to ACR’s idiotic limitation of giving no other choice than the forced embedded camera color profile in Fuji’s Combiner DNG, there are some unavoidable minor colour differences but this will not affect critical judgment of these examples in any meaningful way.
Update 17 March 2025:
I received criticism that the tests for Lens #1 and #2 are unfair comparisons since different raw converters were used. I would have used RawTherapee for everything except it doesn’t yet support superresolution PS16 files, only 4-shots is. But remember, demosaicing isn’t applied to PS16, so it doesn’t really matter what raw converter is used, as long as no sharpening or any other edits are applied, and the tone curve is a close enough match. Slight differences in tonality and colour are absolutely never going to throw off the far more obvious resolution differences we are seeing here. I’ve since downloaded a trial version of Capture One which allowed me to re-run all the files through the same software and using the same exact settings. Capture One has some nefarious behaviours such as applying automatic sharpening, noise reduction and lens corrections by default, all of which you have to find and turn off. Its demosaicing is visibly inferior to RawTherapee’s, producing random dark pixels and some 2×2 blocking is visible in high contrast diagonal edges (AMaZE also suffers from this). In addition, Capture One showed a brightness difference between the PS16 and single frames, even though there isn’t any (stupid bug). After overcoming these, I re-rendered the images and the results and conclusions are unchanged. This criticism was unfounded.
You can think of needing a 3×3 multi-row stitch with 50% overlap between rows and columns to arrive at a stitched result with an identical number of pixels as the PS16 image, i.e. identical pixel resolution. But since I’m just showing cropped samples below, I don’t need all the frames to build the complete stitch, so only the central frame with double the lens magnification or focal length was collected. I deliberately also want to avoid adding another variable of resampling which must occur during the stitch assembly process.
All the crops are from near or on the optical axis of the taking lens, avoiding any unnecessary optical messes that might arise as you move off-axis. Plus I’ve taken pains to rigorously test the selected lenses to ensure they have no optical misbehaviours that might affect this testing.
Setup Notes
Camera: Fujifilm GFX 100S, used in single shot or PS16 mode (2 second delay between frames, timer release 2 or 10 seconds, mounted on Gitzo 3541LS Systematic tripod with Arca Swiss Cube C1 geared head. Set up on concrete, ceramic-tiled floor and target on quartz kitchen countertop or heavy oak table. Care was taken to ensure no detectable air currents (windows and doors closed), no vibrations from fans or running computers etc. The GFX 100S AF system proved to be grossly inaccurate in these experiments. The depth of field was often unforgivingly super slim (~2mm only in the case of the GF110mm) and the targets selected extremely revealing of misfocus. AF would often front or back focus (usually front) and I had to override it manually. The GF lenses by-wire focusing system also has another awful limitation of almost-far-too-large discrete steps in the motors that drive the focus position movements. You can actually hear the lens go “tick…tick…tick…” as it steps through each jump in focus position, rather than glide smoothly in an infinitely variable manner that the older, mechanically-coupled focusing systems do. There were a few times I wished the steps were smaller so that more precise focus could be attained.
Lens #1: FUJINON GF35-70mm F4.5-5.6 WR, representative of a typical standard lens and aperture setting (f/8, which isn’t even as diffracted as f/11 or 16 which many landscape photographers use). Deliberately set up to induce a slight amount of diffraction on the 3.76-micron pixel aperture sensor. This lens is by no means optically poor, though nevertheless is not winning first prize in any sharpness contest. Thorough evaluation guarantees mine is an excellent copy. This test should give you a good idea of the maximum gains to expect from pixel shift in typical shooting situations.
Lens #2: Mejiro Genossen FL0530 110mm F4, a high-end industrial line scan lens. The image quality of this lens is outstanding and represents what you could expect from similar super-sharp lenses. Very few lenses can hope to be better. If pixel shift could take advantage of extra available resolution, it would now.
Lens #3: FUJINON GF110mm F2 R LM WR, added on 12 March 2025 in response to another (unfounded) criticism I received, which was that the above two tests are plagued by diffraction for the PS16 shots, heavily penalising PS16 results in an unfair manner. The premise was since the pixel shifted subframes are shifted by 1/2 a pixel, you must use an aperture that is diffraction limited for 1.88um pixels, not 3.76um pixels, and so an effective aperture of f/6 is well into diffraction blur territory. Rather you need an f/3.5 effective aperture or wider. I disagree, but thought it was worthwhile to test it nonetheless, so there can be no further excuses to avoid the truth.
Multiple test shots were focus-bracketed and taken and scrutinised at 200-400% zoom, not 100%, in Photoshop to select the ones with sharpest focus. All sample crops are from single images, not stacked nor stitched and therefore have not been affected by any resampling interpolation, other than demosaicing, or none at all for PS16 crops.
Test with Lens #1 GF35-70mm
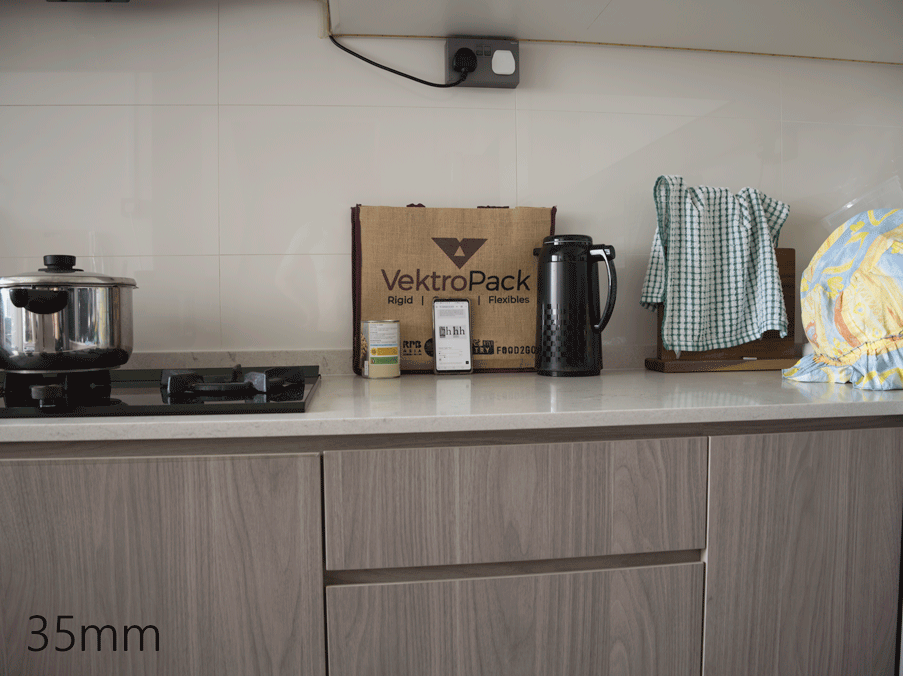
This is the full frame view of the test scene. Crops were taken from the central portion of the images of the mobile phone and woven bag. This animated view shows the re-framing of the scene between the 35mm and 70mm focal lengths, such that the subject of interest remains approximately the same size in pixel dimensions.
I want to get this out of the way: I’m using the same lens for both the 35mm and 70mm focal length test frames, that way I avoid the messes of choosing lenses with different optical designs that might favour the PS16 or stitching scenario. There’s never going to be a perfectly fair way of doing this, unless you do the test like with Lens #2 (update: or #3!) below. I am fully aware that zoom lenses do not perform identically across their zoom range. My copy of the GF35-70 is unusually good, well under 15 microns of tilt error and uncharacteristically even in resolution radially about the optical axis throughout the image field, as well as resolving quite similarly at both ends of the zoom range. I will leave you in no doubt:
100% view of 35mm and 70mm focal length positions of my GF lens, on axis. Subject has been reframed to ensure similar magnification. Slight magnification advantage for the PS16 frames, to prevent any bias towards stitching.
300% zoom view of the above crops, showing very clearly that this copy of the GF35-70 resolves very similarly on-axis at both ends of the zoom.
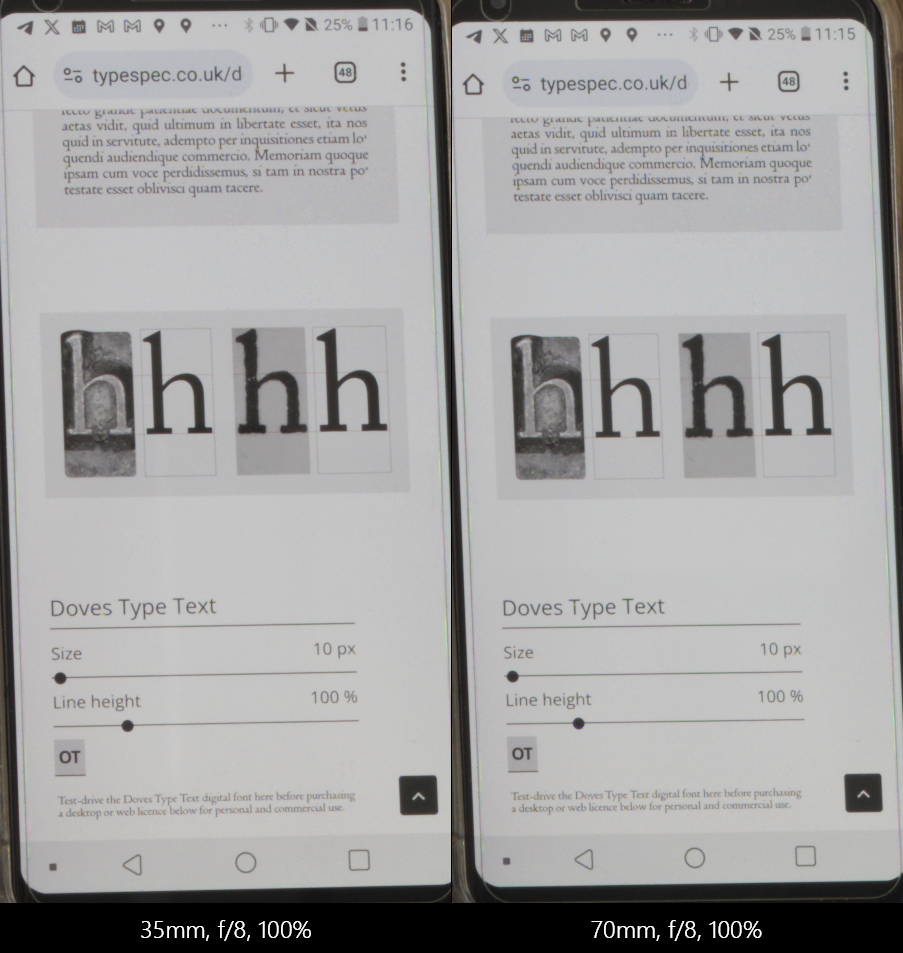
Below are the comparison crop samples. First up are comparisons of high contrast text details displayed on a smartphone with a 537 PPI display (LG V30+).
PS16 (404 MP) vs single shot (101 MP):
The single shot is not zoomed in to 200% to match the detail sizes in this case, so as to give the viewer a sense of the scale of the jump in pixel resolution.
Now both are matched in scale. PS16 looks a bit better but it’s not really any sharper. The horizontal lines look virtually the same in sharpness!
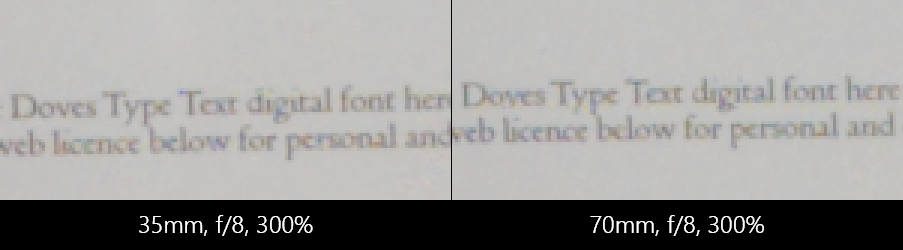
PS16 (404 MP) vs stitching-equivalent (equivalent to 404 MP if stitch was fully rendered due to doubled magnification):
The magnification for the 70mm stitching-equivalent image is actually slightly less than it needs to be, favouring the PS16 in this comparison, yet it is way sharper, and therefore has higher spatial resolution.
You might think “oh wow”, the stitching-equivalent looks way sharper than the PS16 image, and indeed it is because it actually resolves more in terms of spatial resolution, but it is still exhibiting aliasing typical of AA-filterless bayer sensors. What do I mean? Look below, from the same region, a 400% zoomed view, there’s clearly false colour aliasing around the high contrast text lettering. The PS16 image just barely reproduces the pixel grid pattern of the smartphone display (pretty cool to see that) while the stitching-equivalent frame is entirely unable to reproduce any of these details even though the text structures, which are relatively much more coarse, are rendered with much higher contrast. This so happens to be a perfect demonstration (it was unplanned) of the conclusions I detail at the end.
Doubling the magnification is what gives you a true resolution gain, but Bayer issues remain.
Below is an extreme zoomed in crop animation of the simple circle shape taken from the bottom edge of the smartphone display region, with a red line overlay, which demonstrates Jim’s and Frans’ point that the contrast remains the same between single shot (101MP) and PS16 (404MP) images, and the blur width should also be the same. As the single shot is composed of far fewer pixels, it is undersampled and the sub-pixel detail reconstruction is comparatively coarser.
The MTF of the single image and PS16 is theoretically the same, contrast is more or less the same, blur width is approximately the same.
Next I will show comparisons of low to medium contrast organic details that are more commonly found in real world images.
PS16 (404 MP) vs single shot (101 MP):
Subtle differences, as predicted by the theory that pixel shifting does not increase spatial resolution, and mainly improves the reproduction of aliased detail.
PS16 (404 MP) vs stitching-equivalent (equivalent to 404 MP if stitch was fully rendered due to doubled magnification), 100% zoom:
The stitching-equivalent is way better, in fact quite a lot better than I would have assumed.
PS16 (404 MP) vs stitching-equivalent (equivalent to 404 MP if stitch was fully rendered due to doubled magnification), 200% zoom of a different crop:
The stitching-equivalent is way better, in fact quite a lot better than I would have assumed.
Test with Lens #2 Mejiro Genossen FL0530
This set of examples was inspired by my recent forays into the macro photography world. These photographers are some of the most technically proficient I’ve come across, apart from the astrophotography ones. Not surprising since each group is specialised in imaging the smallest or furthest (therefore appearing small in view) possible things, both demanding higher magnification than is typical of regular photography.
At these macro higher magnifications, there is something known as effective aperture that comes into play. It changes with magnification, as extension increases, the light cone projected by the lens has farther to travel and spreads out more, and so the sensor “sees” a much smaller region of this cone. This makes the effective aperture smaller than the marked aperture, which is why macro lenses lose so much light at high magnification and diffraction blurring is an oft discussed issue. I shot wide open (physically f/4) for both the 0.5x (for PS16) and 1x (for stitching-equivalent) magnification shots below, making the effective aperture f/6 and f/8 respectively, giving a clear 0.84-stop advantage to the PS16 image. If it doesn’t seem obvious by now, I’m deliberately trying to help the PS16 results slightly, so we cannot question if there was any unfair treatment. I also want to counter any personal bias towards stitching, something I’ve been a huge fan and practitioner of for landscape photography.
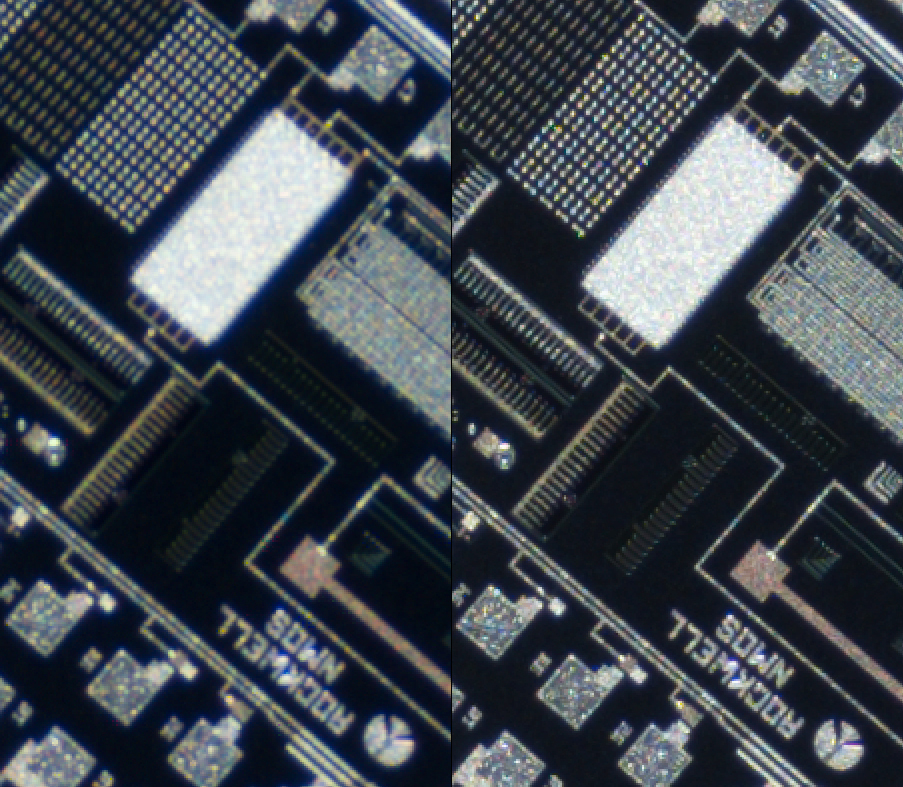
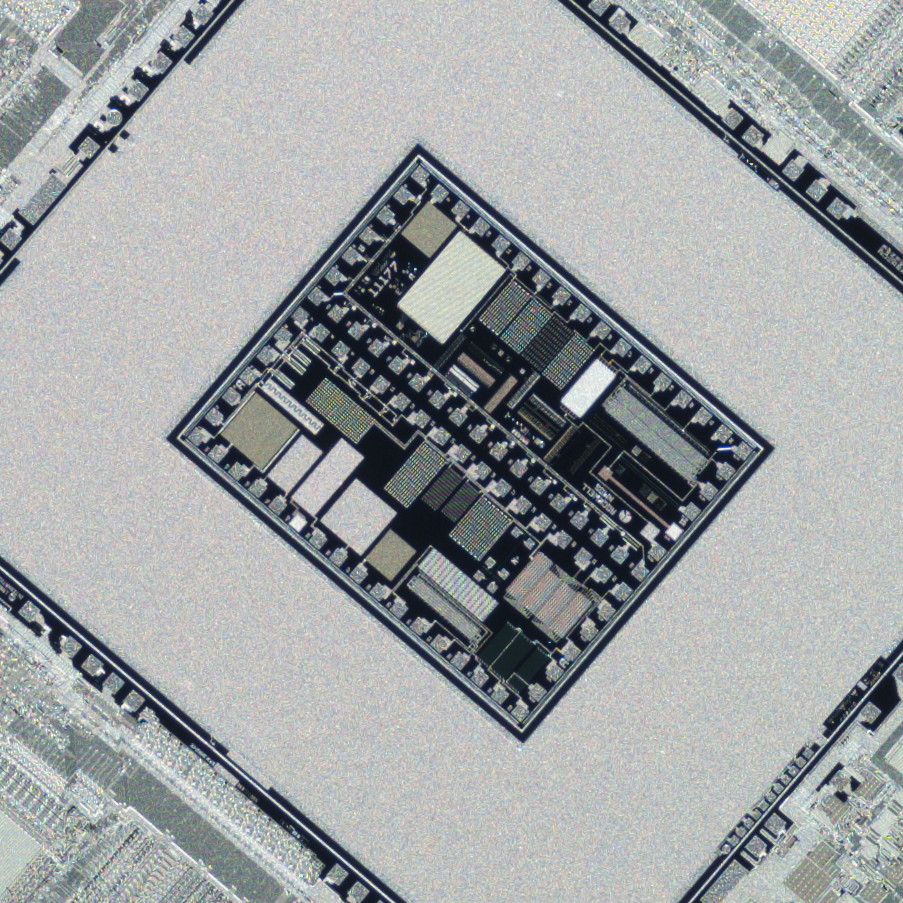
The target used is a 4-inch silicon wafer from 1986 by Rockwell International Corp USA. I learned from the late Robert OToole that they make excellent test targets for macro lenses, being perfectly flat and abundant in lots of fine geometric details, some of extreme contrast (good CA test). It is especially good at revealing optical flaws and sharpness differences. There were two setups in this test, to position different subject matter on-axis, I identify them as “Crop A” or “Crop B” below.
Crop A, from one of the chips:
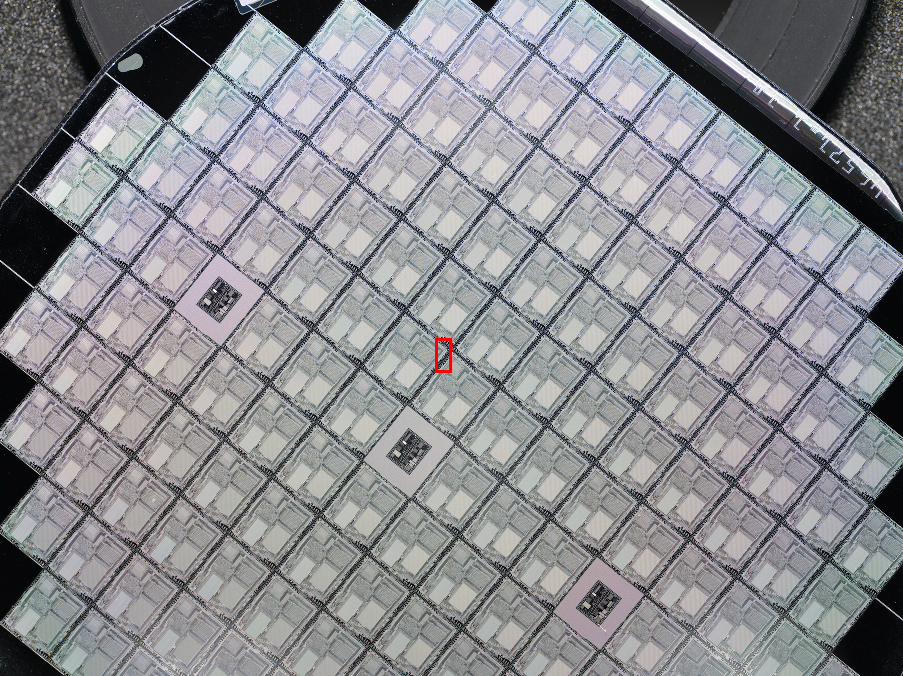
Full frame view of test subject, one of the main chiplets with tons of ultra-fine detail and relatively lower contrast slivery metal is the main subject of interest here. Red rectangle indicates where the crops were taken from.
PS16 (404 MP) vs single (101 MP), 100% zoom:
The regions of slivery metal have extraordinarily fine detail which is well below Nyquist and severely aliased in the single shot frame, while much more correct and accurate reproduction of them is shown in the PS16 frame. However, the overall contrast of the details is similar (MTF is the same).
PS16 (404 MP) vs stitching-equivalent (equivalent to 404 MP if stitch was fully rendered due to doubled magnification), 100% zoom:
Stitching-equivalent clearly much sharper and resolving more fine detail than PS16, but with obvious aliasing.
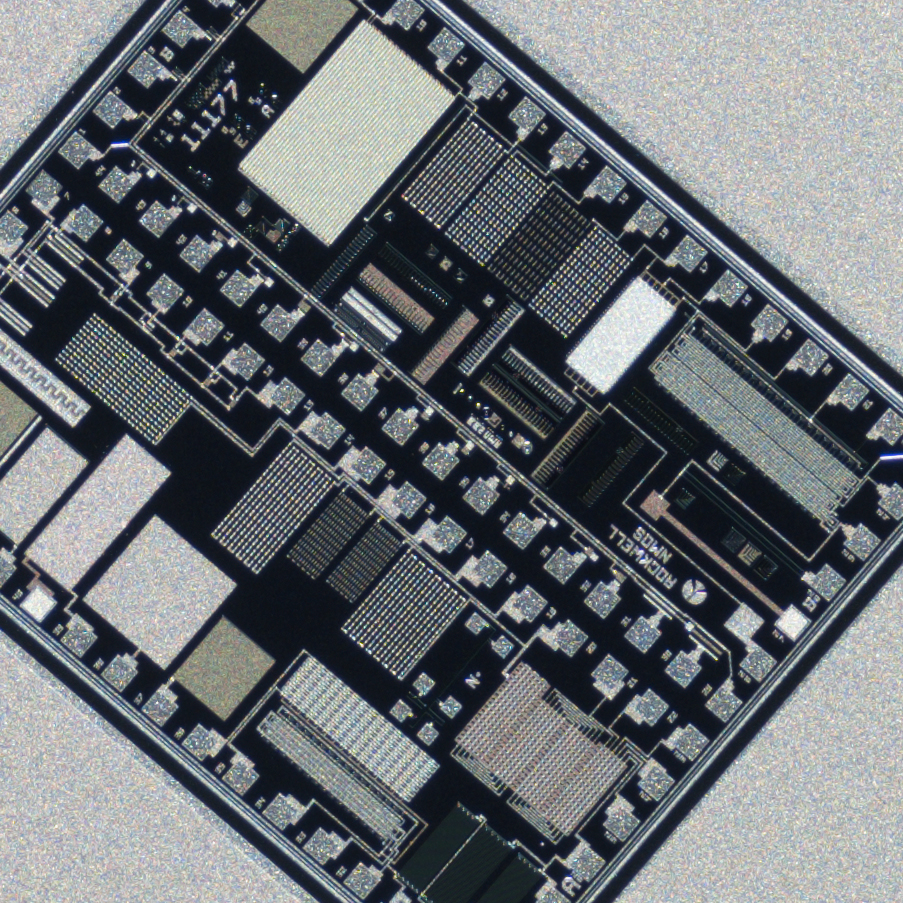
Crop B, from the test structure/die section (I’m guessing that’s what it is, I’m no expert) with tons of super high contrast fine details:
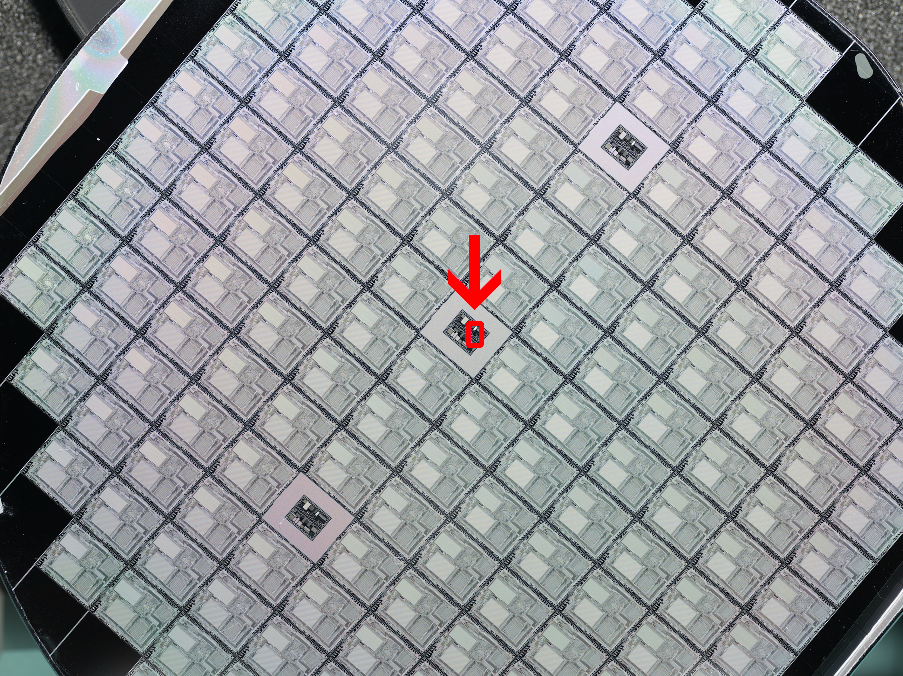
Red rectangle indicates where the crops were taken from.
PS16 (404 MP) vs single (101 MP), 200% zoom to better see the tiny details:
Larger structures like the bright rectangle near the top exhibit the same contrast at the edge. However there’s plenty of detail everywhere else below Nyquist that is heavily aliased in the single shot frame, but is properly reconstructed by PS16. Again, however, the overall contrast of the details is similar (MTF is the same).
PS16 (404 MP) vs stitching-equivalent (equivalent to 404 MP if stitch was fully rendered due to doubled magnification), 200% zoom to better see the tiny details:
Despite the much higher resolution FL0530, and the bias to benefit the PS16 result, the stitching-equivalent still exhibits clearly more spatial resolution. For example, if you look at the edges of the brightest rectangle near the top, you can see a row of tiny dot structures which are very fuzzy in the PS16 image. The fine diagonal lines in the bisected mid-gray region on the right edge are clearly resolved in the stitching-equivalent crop, but virtually not at all in the PS16 crop. All the details are much sharper with higher contrast in the stitching-equivalent crop.
Here are the 100% crops from the single shot, PS16 and stitching-equivalent images, showing a fuller view of this very intricate and beautifully pattern section of the wafer.
0.5x magnification, Single Shot (101 MP), 100% crop, f/4 (effective aperture f/6)
0.5x magnification, Pixel Shift 16-shots (404 MP), 100% crop, f/4 (effective aperture f/6)
1x magnification, Stitching Equivalent Single Shot (101 MP, would be 404 MP if stitch was made), 100% crop, f/4 (effective aperture f/8)
Test with Lens #3 FUJINON GF110mm F2 R LM WR
Update 12 Mar 2025: A fellow photographer mentioned to me that the above two setups must be severely diffracted for the PS16 results, favouring the stitching-equivalent frames very unfairly. Had I used a much wider aperture, PS16 would be much sharper. He hypothesised PS16 would likely be sharper than the stitching-equivalent results, and given the lack of Bayer artifacts, would clearly win in comparison. I disagree, and I was willing to do all the work again to prove it.
I recommend that one starts by reading Jim Kasson’s posts in this DPReview thread, so you can understand the theory that since pixel shifting is essentially using the same sensor, with the same pixel aperture and pitch (he explains what’s the difference there), the pixel shifted result cannot possibly be diffraction limited at f/6 if the single shot images are not. You are effectively having a 400% AA-filter over a 1.88um pixel pitch with PS16 by the GFX 100S, which is essentially arriving back at a 3.76um pixel aperture, so the diffraction limited aperture should be—exactly the same.
The challenge put to me was that I would not be able to re-test this diffraction theory because macro lenses with large effective aperture openings at high magnification and incredible resolution wide open for the GFX are virtually non-existent, so I would just have to accept I was possibly just wrong. Not to be defeated, thinking out of the box, I hatched a different plan: since the theory can be proven at any magnification ratio, I’ll shoot another test sequence at 0.05x magnification for PS16 and 0.1x for stitching-equivalent. And then I can use the gorgeous GF110mm F2, loaned to me by a friend! Why? Because the 110mm is far and away the sharpest, highest resolving prime lens Fujifilm makes for the GFX system, second best is not even close behind, so choosing any other GF lens would only shortchange us of sheer resolving power, plus its very wide physical aperture allows us to put the diffraction accusation to rest. And now, I also cannot be blamed for using non-native lenses not designed for the GFX sensor stack, or be doubted that the float ring adjustment of the FL0530 could be off (it isn’t, and anyway I’ve developed the best custom system in the entire world to ensure it isn’t), or any other kind of compatibility issues!
I’ve posted a great deal of information and additional higher-resolution samples (and extra comparisons at f/2, which anyhow is less sharp than at f/2.8) over on the DPReview discussion thread I’ve started, to bring the discussion public and invite more data and views from those I consider to be of higher authority than myself on the matter. There was a comment on the DPR thread that claims this new GF110mm setup shows much more similar resolution between the PS16 and stitching-equivalent results than in the FL0530 tests, therefore proving the original PS16 results were diffraction limited. That’s pure tosh, and surprised me quite frankly, because I found the same person to be extremely astute otherwise. Check below, I made an example comparing the resolution difference between the FL0530 0.5x PS16 and 1x stitching-equivalent shots, against the GF110mm 0.05x PS16 and 0.1x stitching-equivalent shots, there was no meaningful difference to my eyes. The hypothesis that the pixel shifted results are diffraction limited is just plain wrong, and Jim Kasson is right. Of course I know better than to tell Jim he is wrong.
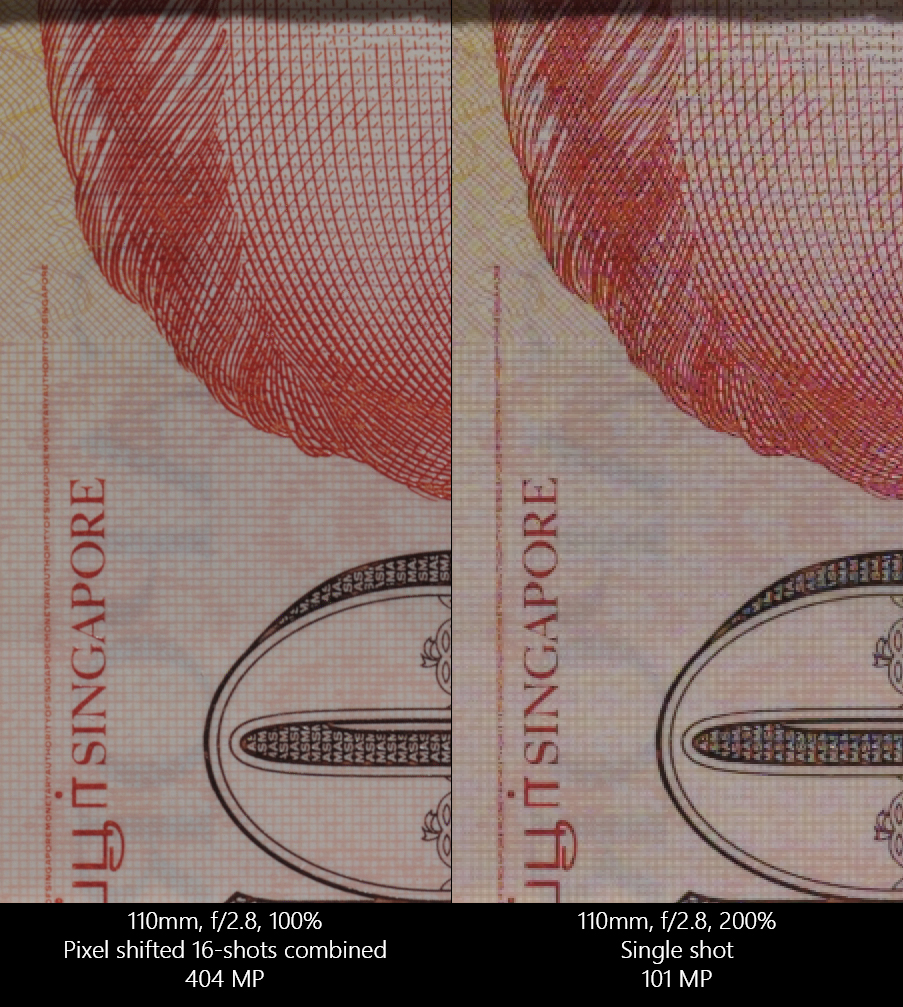
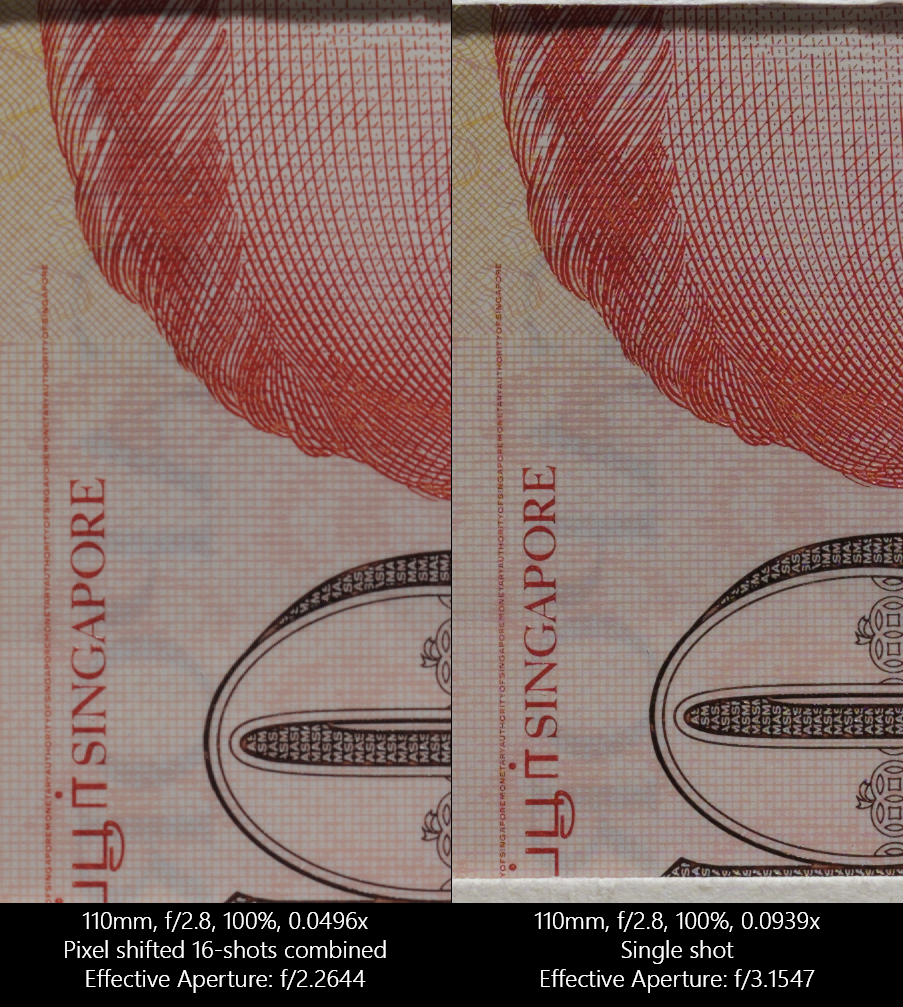
The magnification (computed from the tape measure placed in the capture frames) and aperture I shot the GF110mm at is—
PS16: 0.0496x, nominally f/2.8, measured by PhotonstoPhotos Optical bench at f/2.87, is f/3.0124 effective.
Stitching-equivalent: 0.0939x (it should be 0.0992x, thus giving pixel shift the magnification advantage very slightly), nominally f/2.8, measured by PhotonstoPhotos Optical bench at f/2.87, is f/3.1547 effective.
The effective apertures are well within the values demanded by the hypothesis. I have done absolutely nothing to bias the stitching-equivalent shot. Rather I have actually given a slight advantage to pixel shift, if anything, time and time again. In addition, all the images in this test #3 were processed in Capture One Pro, so not even the choice of raw developer can be questioned. So here goes, starting with the full view:
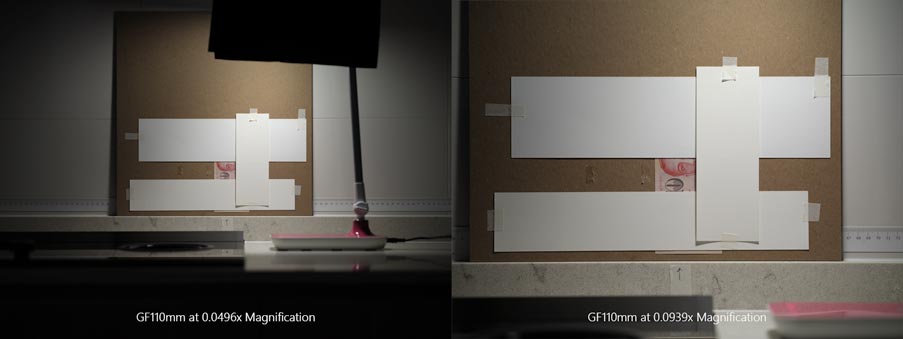
GF110mm F2 lens, full frame view of test scene at both magnifications, using Singapore $10 banknote mostly covered by white paper to defeat Photoshop’s automatic system that prevents anyone from editing images of currency. I don’t have old, non-circulating currency on hand, so apologies that you cannot save these crops and open in Photoshop to play with(singles work, but these comparison crops don’t), and I wanted this $10 note specifically because it is a new type that is printed on plastic with super sharp print, even sharper than the paper ones from the current generation.
Conclusions are unchanged. Pixel shift has similar overall contrast/MTF with far less aliasing compared to single shot. Improved legibility is not the same as improved spatial resolution.
Conclusions are unchanged. Doubling the magnification increases spatial resolution. Diffraction was never an issue for PS16.
Essentially, the conclusions are still the same. If anything, the tests with the GF110mm further emphasises the effects already shown above, rather than disprove the theory. Interestingly, Jack Hogan, who is quite allergic to aliasing artifacts, actually prefers the sharper-yet-still-aliased x2 magnification stitching-equivalent images to the soft non-aliased PS16 ones, as do I.
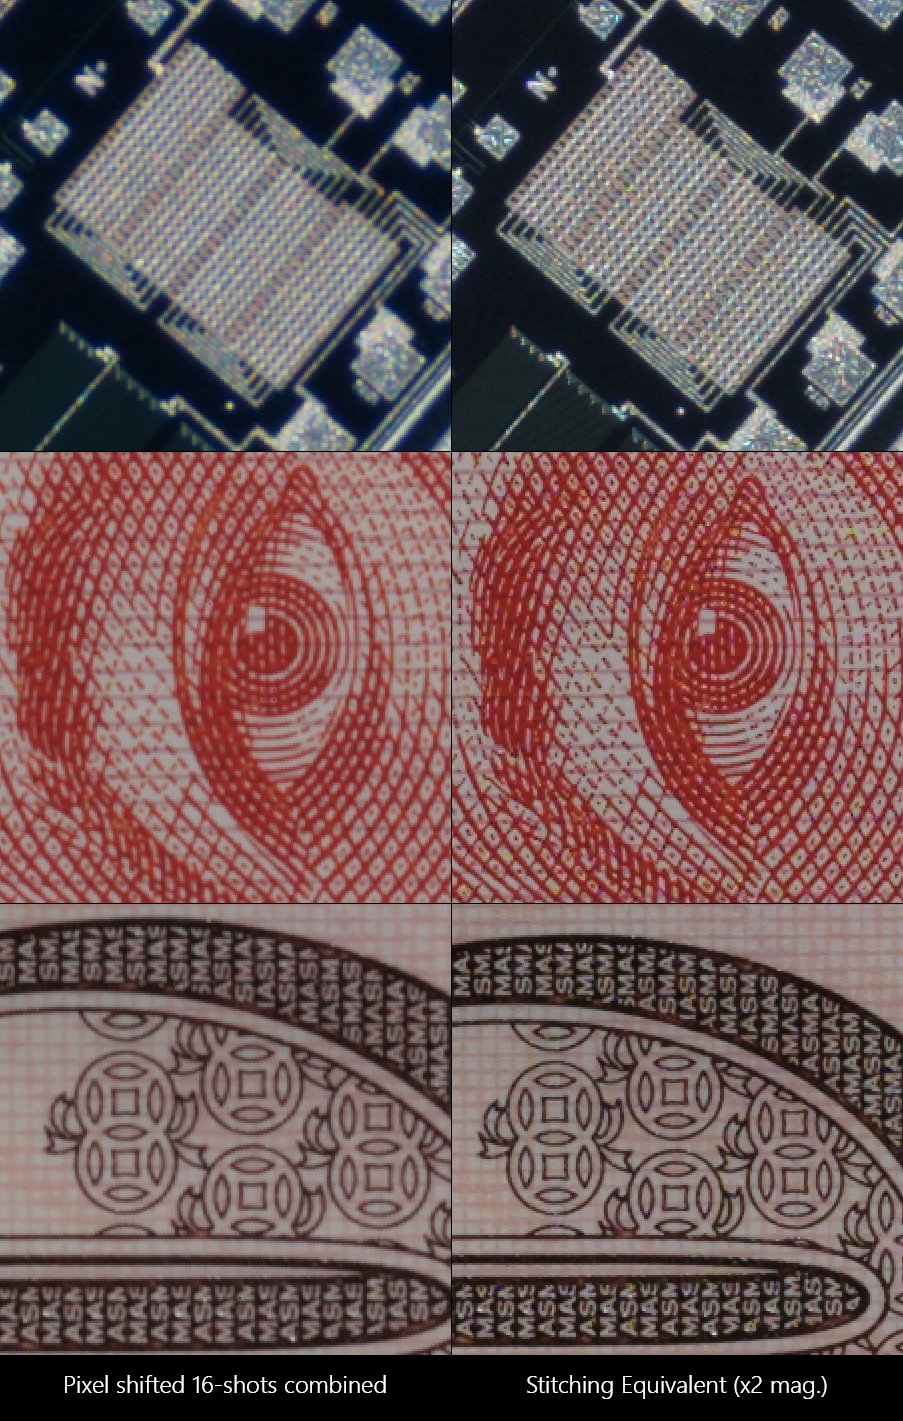
Crops at 200% zoom. Comparing the supposedly diffracted FL0530 results with the GF110, instead I see that they show broadly similar jumps in resolution between all the PS16 and stitching-equivalent crops. So to claim diffraction was ruining the earlier results is incorrect. It’s important to stay open-minded, unbiased and not desire one side to “win” when conducting experiments with the Scientific Method. I’m only interested in the pursuit of the truth (and improving my own photography).
Also, this very sharp GF110mm allowed me to reveal some rather disgusting pixel shift artifacts: zipper-like structures and 2×2 pixel blocking or clumping along high contrast non-vertical/horizontal edges, as well as random clumps of false pixels appearing out of nowhere, which I’m now suspecting is due to the presence of hot pixels inherent to the 100S sensor, no matter if you’ve done the sensor re-mapping or not. I personally consider these artifacts to be incredibly ugly, to the point it completely renders the PS16 method pointless. It looks like pixelation and low-quality demosaicing artifacts, which were the exact things I was supposed to be able to avoid by using pixel shift to begin with. I don’t know if it’s due to Fujifilm’s Pixel Shift Combiner’s limitations, since PixelShifttoDNG does not work on its files, nor does RawTherapee. Apparently Sony’s app is also wonky, but the same files show no artifacts when processed by PixelShifttoDNG, though I have not been able to verify this at the point of writing.
Also note that despite the stronger sharpening recipe used to favour the PS16 image below, it never truly catches up to the stitching-equivalent result in sharpness, not to mention the overall level of artifacts put it well and truly behind.
These 400% zoom crops are meant to draw attention to the pixel shift process artifacts. The red arrows guide your eyes to the most nefarious ones. Excellent quality capture sharpening was applied (you can see almost zero halos despite the extreme zoom) to enhance the visibility of the artifacts. Don’t accuse me of using sharpening to highlight problems unfairly. If it is there, it is there to begin with. Also, capture, creative and output sharpening is all necessary in the workflow pipeline to make great high-quality images.
Conclusion and thoughts
Resolution & Sharpness
PS16 Resolution:
– No meaningful change in spatial resolution versus single shot, edge contrast remains the same, MTF should be the same
– Reproduction of aliased details improves significantly, virtually no aliasing remains due to the accuracy of the GFX 100S sensor positioning, more accurate reconstruction of fine details
Stitching Resolution:
– Higher magnification results in truly higher actual resolving power
Winner for Maximum Resolution: Stitching.
Pixel-level Quality Factors (Aliasing, Noise, Artifacts)
PS16 Quality:
– Much better luminance and color accuracy, virtually no aliasing
– No Bayer demosaicing errors
– No seam blending or stitching errors
– Presence of undesirable pixel shifting artifacts (zipper structures, 2×2 blocking/stair-stepping, random hot pixel clumps)
Stitching Quality:
– Still relies on Bayer demosaicing with its errors, not as perfect as PS16
– Details below nyquist will be aliased
Winner for Pixel Quality (Pixel level accuracy): PS16 (with caveats)
Other important Pros and Cons of each method
Pixel shift:
– Highly vulnerable to subtle camera/subject movement, changes in lighting. – Almost impossible to use outdoors.
– File size disadvantage, 16 shots must be taken, totalling 2.25GB per sequence for GFX 100s. For Sony, raw files are forcibly uncompressed (what a stupid software limitation), meaning you’ll be dealing with 3.85GB per sequence for a7R IV/V, despite less pixel resolution than the GFX 100S!
– Stuck with native aspect ratio of sensor.
– At the mercy of off-axis lens quality issues, vignetting, resolution loss, aberrations, distortion etc. are only captured in even greater detail, never minimised or avoided.
– Note that the Fujifilm Pixel Shift Combiner app will throw out a somewhat scary error message “defect detected” if your images have out-of-focus or diffraction blur, but the output DNG is still constructed, but potentially with alignment issues (it was in the one test I did).
Stitching:
– Can suffer from blending artifacts, depending on parallax errors, degree of overlap and stitching software among other issues
– However, with significant overlap between frames, minor subject movement across seams can be mitigated through intelligent seam carving in the stitching software, making it viable for usage outdoors
– With ~50% overlap between frames, only the central portion of the optics are ultilised, which generally tends to be where optical quality is highest, thus preserving higher image quality across the entire composition and PTGui stitching effectively eliminates vignetting and most lens distortion.
– File size advantage, 9 shots only to achieve even greater resolution than pixel shift, ~1.25GB per sequence for GFX100S
– Free of native aspect ratio of sensor.
– Resolution upside is unlimited
I learned from Jack Hogan the theory for why doubling the magnification should easily win outright. It is simply this. When you double the magnification, it’s the same as your subject growing 2x linearly in size. So what was 100lp/mm detail is now 50lp/mm worth. If you are able to get the MTF data for your lens, you will know that the lens would resolve significantly higher contrast at half the lp/mm, so doubling the subject size basically taxes the lens’s resolution much less, or you can say you have more resolving power for what is now 2X larger details.
I think the benefits of pixel shifting has merits, but also limits. If the data load is not an issue, it can be very helpful to collect aliasing-free data for digitising collections and archives of all sorts if the process artifacts can be avoided. If you don’t want to mess around with telecentric lenses to avoid parallax issues, it’s also easier to use PS16 for high magnification macro setups than to try and stitch. For everything else, stitching is probably better and more useful.
If you are reading this, feel free to make your own tests! Especially if you have an a7R V, which I hear is artifact-free. I would love to hear about your results, you can share them here.
Samuel Chia
5 Mar 2025
Updates have been added throughout the article since.
Comments are Disabled